How to preserve orchid roots during transplantation - is it possible to prune them and what to do to prevent damage?

Do I need or don't need an orchid transplant? This is always a stress for the plant, even if it is carried out according to plan. An orchid can then begin to hurt and temporarily stop the growth of roots.
But there are situations when a transplant is absolutely necessary. What to do in this case, so as not to injure even more affected roots, and where to get aerial roots when transplanting - this is our article.
Reasons for an unplanned “change of residence”
Important! The only serious reason for an unplanned orchid transplant is root problems.If it doesn’t bloom for a long time, it’s just been bought, or you don’t visually like the pot - this is not a reason to injure the plant (more about whether a plant should be transplanted immediately after purchase, read here). Here are the issues that really matter:
- Rotting of the roots. Occurs due to ramming of the soil: the crust breaks up over time and begins to coalesce. This restricts air access. It is also possible to rot if improperly watered and grow in an unsuitable substrate (in the ground).
- Cessation of root growth due to lack of space in the pot. The roots begin to compress themselves, displacing the soil. This also leads to decay.
- The growth of small roots outside the pot. The roots can completely braid the pot from the outside and turn into a kind of hydrophobic dry sponge, from which all moisture will bounce. No matter how you fill the plant, it is not able to eat normally.
- Drying root system. By itself, it is not a reason for transplanting - only if the roots dry out due to soil problems. For example, it is salted or completely decomposed and now prevents the orchid from absorbing water.
- Pests that appear in the pot and harm the roots. If they cannot be deduced in this way, a transplant is urgently needed.
Details about when you need to transplant an orchid at home can be found here.
How to avoid damage?
 In the process of transplantation, it is necessary to take into account the fragility of the root system of the orchid, and try to minimize the risk of damage. After the plant is in your hands, rinse the root system and examine it.
You need to rinse with warm, settled water, or, as an option, running from the tap (but see if it is hard). If the roots are too tangled, you should untangle them. This is done from bottom to top, with careful movements. Check for rot in the middle.
Orchids in stores are often planted on the so-called "moss bomb" - a piece of compressed sphagnum that retains moisture at the roots. Ideally, it accelerates plant growth, but in practice often leads to decay. If such a "present" is really under the roots - it is taken out.
Reference. Pests can also be hidden in the root system. If the parasite is found, the orchid should be soaked for several hours in warm filtered water. Most pests will die.After this, you need to treat the roots with a special remedy for the type of pests that was found in the roots.
Is it possible to trim the root part when moving to a new pot?
Many gardeners, especially beginners, are interested in how to transplant an orchid, if the roots grow from a pot, can roots be cut off at the same time? Not only possible, but sometimes necessary. This is done if:
- There are rotten or dried roots.
- The roots are fine, but their volume is too large, they braid each other and prevent moisture from entering.
Without risk for orchids, 1/3 of the root volume can be cut. If cut more - the flower will need resuscitation.
Trimming is done with well-sharpened small scissors or a small pruner. Before starting the procedure, the instrument must be disinfected. It is best to place a solution of alcohol next to it and immerse scissors into it after each new cutting of the root: this way you will not spread the infection.
How to distinguish healthy roots from patients?
There are two ways:
- By color. Healthy roots are covered with velamen (spongy tissue) bright white. Fluctuations from green to silver are allowed. A change in this color indicates a poor condition of the plant, as well as its disease.
 The yellow roots are lively, but indicate that the plant lacks light. If brownishness appears on the roots - this indicates irrigation with hard water or drying out. If black spots have gone, it is most likely rot. If the roots are swollen and white dashed lines go on them, it means that the watering is too plentiful.
 - To the touch. Squeeze the spine slightly. If it is resilient - everything is in order. If he easily misses under the fingers, mucus is released from it, then he died.
 The yellow roots are lively, but indicate that the plant lacks light. If brownishness appears on the roots - this indicates irrigation with hard water or drying out. If black spots have gone, it is most likely rot. If the roots are swollen and white dashed lines go on them, it means that the watering is too plentiful.
But the wrinkling of the roots, their external drying does not always indicate the death of the root: the inner root can remain alive while the velamen shrinks due to lack of moisture. To understand which roots are alive, it is worth holding an orchid in water. Healthy roots are nourished by moisture, inflated and straightened. Only then can you start trimming.
Important! Some roots lack a part of velamen. It looks like this: a thick root goes on top, then a thin thread and then a thick root follows it again. Do not cut these roots: if an insignificant part of the velamen perishes, then the spine will still live and continue to feed the plant.Possible negative consequences
No matter how carefully you do all the manipulations with the orchid, some of the roots will still be damaged, especially at the beginning flower grower. If the damage is minor, there is nothing to worry about: the root system of orchids has a sufficient margin of safety and elasticity. A small violation of the integrity will not prevent the orchid from growing, and its root system - to function.
Broken roots cannot be trimmed. This will reduce the viability of the plant.
Various plant diseases can provoke damage to the main root thread, which should be paid special attention to when transplanting.
There is also a danger if a large volume of roots was removed during the pruning process (in this case, the orchid is useless to plant on a substrate, it needs resuscitation to begin with) or if the cracks, sections and wounds that inevitably appear during transplantation on the roots rot. In this case, the transplant will fail and the orchid will die if measures are not taken in time.
What to process?
Before transplanting, the roots need to be processed: this way you will ensure that the orchid has trouble-free growth.
For the prevention of diseases, they are treated with a 0.2% solution of Fundazole or a 0.2% solution of Topsin, for the same purpose the plants are soaked in a solution of Fitosporin (dosage - 10 drops of the drug per 200 g of water).
 What to choose is up to you. Funadzol is most effective, but it inhibits plant growth, and besides, precautions are needed when working with it: it is toxic. Fitosporin is best suited for prophylaxis - it kills any fungi and bacteria.
After pruning, sprinkle the roots with cinnamon powder, or crushed charcoal, or - as some flower growers advise - grease with green. But the last option is debatable: it’s so easy to burn the roots.
How to transplant: step by step instructions
The method of transplanting orchids depends on the volume of its roots. If the plant is left without roots, it is impossible to plant it immediately in the substrate. To begin, place the orchid in the greenhouse, on wet moss. Ventilate the greenhouse every day and wait for the roots to grow. Only when they reach 5-8 cm, the plant can be planted in ordinary soil, but in a small pot.
If the plants are large and long aerial roots that grow from a pot, here's how to transplant them:
- Remove the plants from the old pot. To facilitate this work, pre-soak the substrate by immersing the pot in the settled water. Wash the pot in your palms so that the roots loosen the grip, and carefully remove them along with a lump of substrate from the pot.Note! If the root is stuck in a slot or drainage hole, it is not necessary to tear it off, this will provoke decay. Just cut the plastic and free the roots.
- Prepare the roots as described above.
- Leave the orchid to dry for several hours. No need to be afraid to take this step: it will not die.
- Take a transparent pot and make additional drainage holes in the side walls. You need to choose a pot 2-3 cm larger in diameter than the previous one (if the root system has remained untouched).
- Pour a little substrate into the bottom of the pot.
- The orchid is placed in the center of the pot, spreading, as far as possible, aerial roots. The root neck should be flush with the edge of the pot. Upper aerial roots do not fit into the pot.
- Hold the orchid by its root neck and fill in the free spaces between the roots and walls of the pot with a substrate. Try not to move the plant and firmly fixed in the pot.
 Tap the walls so that the substrate is donkey. Fill up if necessary. You can not tamp the soil: this will break the roots of the orchid and, in addition, deprive them of access to air.
- After transplanting an orchid, she needs to provide comfortable conditions for adaptation: adequate lighting, but without direct sunlight. The temperature is at least 22 ° C and the humidity is at least 50%.
 Tap the walls so that the substrate is donkey. Fill up if necessary. You can not tamp the soil: this will break the roots of the orchid and, in addition, deprive them of access to air.
You can water the plant no earlier than 5 days, and to feed - in a month.
Watch a video on how to transplant an orchid:
Problems and their prevention
After a root transplant, problems sometimes begin. Often after that they rot. This happens if the plant is too hastily watered. Moisture got on small wounds, not yet dragged on to the end, and provoked the development of rot.
The same situation can occur if disinfection or drying has not been done. In this case, if the root system is strong, the plant adapts on its own - just reduce watering. If the orchid was initially weak, a second transplant will be required. Read more about what problems may arise after transplantation and how to deal with them, read here.
But more often, after a correctly transplanted orchid quickly adapts. After some time, she will delight you with new leaves and peduncle!
Watch the video: Phalaenopsis Orchid Care :Trimming Dead Roots, Removing old Orchid Blooms & Cleaning Orchid Leaves (November 2024).


-
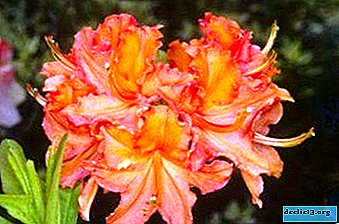
What are the features of Mandarin Lights azalea flowering and plant care?
Azalea Mandarin Lights is a particularly popular and widespread variety among lovers of exotic flowers. The variety is distinguished by a special decorative bush and expressive flowering brightness, which will allow the plant to become an ornament of any garden. From this article you will learn about the subsorts of this azalea, the rules for caring for it, get acquainted with the method of reproduction and methods of combating diseases. ... -

-

-