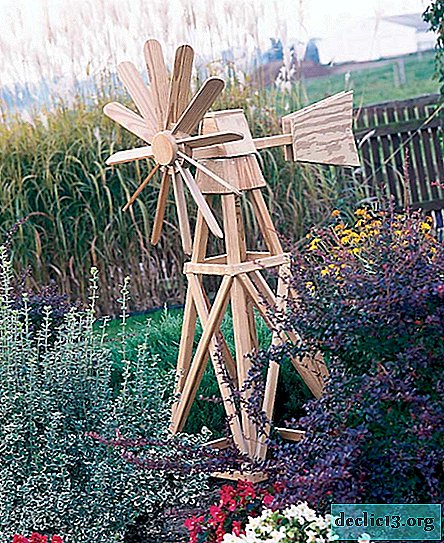
DIY mill: step-by-step workshop
Owners of a house or a summer cottage know firsthand that to create an attractive appearance for the whole territory you need to make a lot of effort. At a minimum, basic lawn care is required. And of course, do not forget about landscape design and additional decor of free space. In specialized stores there are a huge number of different options. But still we propose to make our own stylish, original decor in the form of a mill.


DIY mill: step-by-step workshop
Of course, the process of creating such a design is quite complicated, especially for a beginner. Therefore, we recommend that you follow the step by step instructions in the photo.

For this we will prepare the following materials:
- plywood;
- self-tapping screws;
- wooden blocks;
- glue;
- long and short hairpins;
- Scotch;
- wooden planks;
- clamps;
- gaskets;
- nuts
- ruler;
- pencil;
- saw;
- scissors;
- stationery knife;
- vise;
- screws;
- Sander;
- polystyrene hemisphere.
Getting to the creation of the frame. To do this, we cut the blanks of the same shape and size, as shown in the photo.


On the working surface we put all six blanks, pressing them pretty tightly to each other and fix with tape, but only on the front side.

We turn the workpiece over on the other side, apply glue to the grooves and to the sides of this structure. Try to do this as quickly as possible so that the glue does not harden.

Immediately we assemble the structure, as in the photo and for reliability we fix it with tape. Leave for several hours until completely dry.

If necessary, we cut off the remaining glue from the inner surface of the workpiece. This is necessary so that they do not interfere with the work process.

Based on the dimensions of the inner part of the top of the hexagonal workpiece, we cut out the cover of the same shape. In the center we make a small hole and screw the screw a little bit to the end. Apply glue on the inside.

We turn over the prepared frame and install the cover, as in the photo. Leave the item to dry completely.

In the meantime, we begin work on the foundation of the mill. To do this, cut two blanks in the form of a hexagon. Please note that one side should be equal to the length of the inner edge of the base itself. Also in one of them we cut out a square, and in the second a small hole-mark. 
Also cut the sides in the amount of six pieces. We add three of them to each other and fix with adhesive tape on the front side. Apply glue to the grooves on the inside, as well as on the three sides of the two hexagons. We connect the parts together, fix them with a vise and screws. By the same principle we attach the remaining parts. 
We insert a block into the finished structure and fix it with a screw from the top cover.

We install this workpiece on the work surface, and on top we place the frame. We glue them together, and also fix with tape. For better traction, a small load can be put on top.

We remove the tape and carefully grind the entire surface of the structure.

The next part of the mill consists of three blocks. The lower part is a hexagon, the side walls of which are connected by glue and tape. We also attach the board to the opposite walls with screws or glue. Exactly in the center we set up a pre-prepared square box of wood.

On the previous workpiece, you need to attach a hexagonal pyramid without a vertex. It is done on the same principle as the first blank.

We collect one more piece. But unlike the previous one, it should not have a slope. In addition, grooves must be present in the upper part. This is necessary in order to establish an observation deck.

The last three prepared parts are assembled and fixed together with glue, as shown in the photo. From above we set a heavy object so that they connect better. After complete drying, gently cut off the glue.

We begin to create a decorative viewing platform for the mill. Cut six bars of the same size. At the ends we make small holes that will be marks for the screws. Also cut out five sets of trims.


In this case, we offer to make a site template for convenience. We spread the strips on the adhesive tape and glue them together. At the joints we install the bars and fix them with a vise.


Remove the workpiece from the template, and then fasten the bars with screws.

We complement the viewing slats in the form of a railing.


We turn the upper part of the mill and attach the frame of the observation deck to it. We install it in the grooves and, if desired, can be pressed down with a load for several hours.

We cut out the fastener ring and base from plywood, according to the size of the hemisphere.


Cut two square-shaped blanks for the frame. We put them together, fasten them with a vice and make holes according to the size of the bearings.

We unfold them and make marks for the screws in two places.

Carefully cut the blanks in the middle of the circles.

We put the bars between the two elements and glue them together.


Insert the pin into both bearings and fix with nuts and washers.


We make a mark on the dome, and then glue it with a ring. We fix with tape for reliability.


We connect the details, as in the photo.


On the bar, we mark the circle, and then drill holes.


We prepare four blades of the required size.


Separately, we cut out four bars and make a hole in the end of each. It is necessary for fixing the studs. On the other hand, glue the blades to the bars. We connect the details together as in the photo.


We fix the blades in the mill. Stylish and original decor for the yard is ready.

Decorative mill: the most stylish design ideas in the photo


The decorative mill is a real find for connoisseurs of the original and at the same time minimalistic decor for the courtyard. With its help, you can not only decorate the free space, but also emphasize the good taste of the owners of the house.
Watch the video: Workshop Storage - Cutting Foam Inlets on the CNC (December 2024).


-
Landing page (Landing page) - what it is and how to create it for free - the best Landing Designers + examples and templates for selling landing pages
Hello, readers of the financial magazine "RichPro.ru"! Today we’ll talk about the landing page, what it is, what advantages and disadvantages it has, etc. Landing ("landing page" or landing page) is a fairly well-known term for a web page with a specific specification. However, the essence of such pages is not known to everyone. ... -

-

-