Features of the reproduction of anthurium at home, as well as subsequent care for it
 Like many plants, anthurium has other, quite original names. "Male happiness", "artist's palette", "flower - tail", "flamingo flower" - all this is anthurium. The homeland of "male happiness" is Central and South America, that is, an area of humid hot climate.
Having created conditions close to tropical for Anthurium, there will be no problems with growing this spectacular flower. In the article we will tell you how to root and propagate this plant at home, as well as about further care for it.
At what time of the year is it best to propagate “male happiness”?
How is “male happiness” propagated? The period from April to August is most favorable for flower propagation.. This is a period of active growth and the plant multiplies more easily, will survive stress and take root more quickly.
- Reproduction by dividing the bush of an adult plant is recommended in the spring, from March to May.
- February is favorable for propagation of plants by cuttings. Just before the period of active growth, you can root the stalk.
- Seeds for seedlings are sown in February.
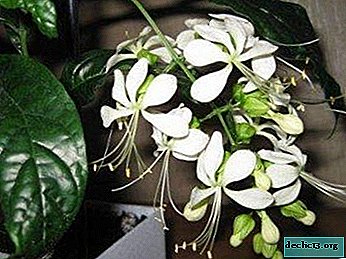
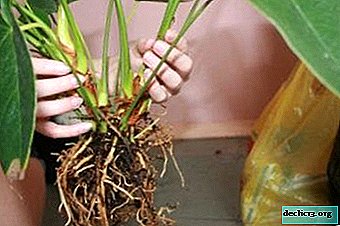
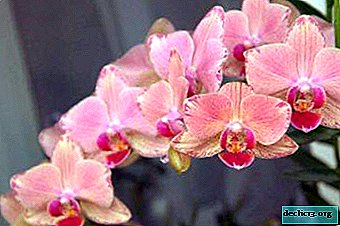
Photo
In the photo you can see how the anthurium flower with aerial roots looks like.


How to prepare a pot for planting?
How to plant in a pot at home? The basic requirements for a flowerpot for planting male happiness:
- Dimensions.
The pot fits shallow and wide. A tight flowerpot is desirable for plentiful flowering, and a wider one for growing "children".
- Material.
- Plastic, glass - preferred.
- Ceramics, clay - they pass air well, but intensively evaporate moisture, the difference in temperature of air and soil in the pot is noticeable. In addition, there is a risk that the roots will grow into clay. Therefore, the clay pot should be coated with glaze.
Land selection
Land for planting a flower must meet the following requirements:
- Lightness and breathability.
- Slight acidity.
- The ability to absorb moisture.
- The composition should include: horse peat, coarse sand, leaf humus, turf land.
Before planting properly, soil requires the following preparation:
- The soil must be steamed for disinfection.
- Soak for several minutes in potassium permanganate.
- Dry to light moisture.
How to grow and plant seeds at home?
Propagation of the flower by seeds at home is time-consuming and inefficient. Usually this method is used in greenhouses and breeders.
Important! Anthurium seeds retain their germination for 2 to 3 months. Therefore, when purchasing seeds in a store, you need to pay attention to the expiration date of the seed.- Seeds are laid on moist soil and do not sprinkle.
- The container is left in a warm place.
- Shoots appear in two weeks.
Flowering during propagation by seeds will come only after 3-4 years.
Cuttings
 At home, rooting of cuttings will be successful, subject to the following rules:
- Take cuttings exclusively from healthy flowers.
- The shank should have 2 to 3 internodes.
- The presence of intact kidney growth.
Rooting of cuttings is possible in such environments:
- In water. Sprouts are planted in the ground immediately after the appearance of the first roots.
- In the substrate. Cuttings are rooted in a substrate of sand, peat and perlite.
- In the moss. For rooting, you can even use a plastic bag.
We suggest you watch a video about the cuttings of anthurium:
Leaf
- The leaf is taken with a fragment of the stem and aerial root.
- A sheet twisted into a tube is planted so that only a third of the sheet is above the ground.
About a month later (subject to all conditions) a sprout appears from the center of the tube.
Attention! When a flower propagates by a leaf, the probability of successful rooting is small.Lateral shoots (shoots)
Instructions on how to properly grow the roots and plant a flower using the side shoots.
 Within two to three years, the anthurium grows and produces young lateral shoots - shoots. Carefully separating them, you can get young seedlings. The most viable will be the escape, which will have:
- Growth point.
- A pair of large leaves.
- Small aerial roots.
Escape is done with disinfected tools. The following procedures are performed with seedlings.:
- To develop the root system, the shoot is placed in moistened perlite, sphagnum or moss for one to two weeks.
- If the shoot has a sufficiently developed root process, it immediately lands in the prepared soil.
In no case can you deepen the growth point.
- Capacities with sprouts are placed in a well-lit place, but without direct sunlight.
- Watering is carried out with warm, settled water after drying of the upper ball of soil. Water in small portions.
- Fertilizing with complex fertilizers should be started after 2-4 months.
Further care is no different from caring for an adult plant.
We suggest you watch a video about the reproduction of anthurium by the lateral processes:
Dividing the bush
One of the most popular and practical ways of propagating a flower is the bush dividing method.. In fact, it is a rejuvenation of the bush.
Attention! Young plants cannot be separated! They simply grow weak or do not take root at all. The optimal age for dividing the bush is 4 - 5 years.It is necessary to separate the old flower so that the parts to be planted are approximately the same: an equal number of growth buds, leaves and roots. Do not get carried away and divide into too small parts.
The process of propagation of a flower by dividing a bush is quite simple:
- Carefully remove the flower from the pot.
- Soak the root ball for several minutes in water.
- Separate the root system with your hands.
- Trim shoots over 30 cm.
 Separate from the bush part with one or two shoots and roots.
- Remove flowers and damaged leaves.
- Sprinkle slices with charcoal powder.
- Plant in a container with prepared soil and drainage.
- Water and put in a bright place, protected from direct sunlight.
 Separate from the bush part with one or two shoots and roots.
Propagation of the flower by dividing the bush in winter and autumn is undesirable. Winter is a constant stress for home plants: dry air in apartments, lack of lighting. In addition, planting stimulates growth, and in winter it is an undesirable process.
Growing Features
Leaving after planting is not particularly different from general care for anthurium, but some points worth noting:
- Ensuring optimal temperature (from 19 to 27 degrees).
- Protect the young plant from temperature changes and drafts.
- Light must be diffused.
- Increase the number of sprays and reduce watering.
- Tie up a fragile stalk.
- Topping a transplanted plant for 4 to 8 weeks should not be done. During this period, the root is under stress and is prone to burns.
What to do if it does not take root?
Sometimes, after an anthurium transplant with a violation of the root system, the plant does not grow, the leaves turn yellow and fall.
- Possible causes of yellowing and leaf loss.
- Lack of oxygen to the roots.
Reason: overflow and stagnation of water in the container.
Solution: reduce irrigation and loosening the soil.
- Excess fertilizer in the soil.
Reason: the first three months after planting, mineral substances are not absorbed, but only give a root burn.
Solution: transplant the plant into a new substrate or rinse this one.
- Lack of oxygen to the roots.
- Possible causes of leaf drying - lack of moisture.
Reason: irrigation mode is violated, lack of spraying in the heat.
Solution: increase humidity, up to placing the plant for a while in a plastic bag.
The exotic tropical plant Anthurium is quite whimsical for the maintenance of the house. But with proper and competent care, as well as observing the basic rules of rooting, you can grow this wonderful flower in an ordinary apartment.
Watch the video: Asexual and Sexual Reproduction (January 2025).


-
How to cook beet kvass - 7 step by step recipes
How to cook beet kvass at home? You will need two main components - fresh vegetables and rye crackers. There are more complex recipes with the addition of additional ingredients (sour cream, whey, dried fruit, etc.). Beet kvass is a healing drink with health-improving qualities, a source of useful trace elements and substances. ... -
-
-