A detailed guide on how to grow wisteria from seeds at home
Wisteria is propagated by cuttings, shoots, vaccinations and seeds. Let us consider in more detail how to plant and grow wisteria from seeds at home.
And also we will talk about the advantages and disadvantages of this method of reproduction and how to properly care for the plant after the seeds have sprouted, what to do if wisteria does not take root at home.
Advantages and disadvantages of the method
We describe the advantages and disadvantages of the seed propagation method.
Pros:
- A simple method, a beginner can handle it.
- Seeds remain viable for up to three years.
- Seedlings grown from seeds are hardy and resistant to changing weather conditions. The method is effective for cold regions of Russia.
- Sometimes seedlings are superior in decorative qualities to parents, these plants are used by breeders.
- Cheap method: seeds are 8-10 times cheaper than a seedling.
Minuses:
- Seedlings bloom in 4-9 years.
- Decorative properties of lianas are not always preserved.
- Poor-quality seeds give germination - 25-30%.
When is it better to do this, is it possible in winter?
Seedlings are planted and transplanted into the open ground in spring. Seeds are planted in greenhouses or in home containers in late autumn and early winter. Sometimes seeds are sown in the spring immediately in the open ground, seedlings are grown during the summer. About growing wisteria in the open ground is described here.
How to choose and prepare the land for planting?
So that the seeds give strong shoots, we prepare the earth. Wisteria loves the soil light, loose, saturated with air, slightly alkaline with a minimum content of lime. When choosing a purchased soil, pay attention to the composition. Wisteria does not tolerate calcareous soils. From excess lime, the leaves on the shoots brighten and lose their decorative effect.
Propagation soil by seeds: peat, humus, turf land and sand. We prepare in a ratio of 1: 1: 1: 3.
Wisteria loves moist soil, but not saturated with moisture! When preparing the land for sowing seeds, create optimal humidity using drainage. On marshy soil, the roots of an adult creeper rot, and the seeds will not germinate.What does the seed look like - photos, selection tips
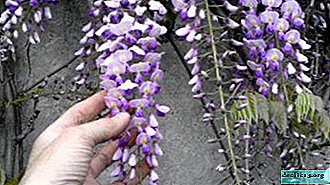
Depending on the type of wisteria, the color and size of the seeds are different. For example, white wisteria seeds are smaller than lilac ones. The characteristic shape for most seeds is round, the color is from dark brown to light beige with a greenish tint. Seeds for planting, choose dry, without mold, dents and cracks.
Determine which creeper is right for your climate. Note that out of nine species of wisteria in central Russia, three take root: Chinese wisteria, multi-flowered and shrubby. The choice of variety depends on the color preferences of the gardener, as well as on the compositional plan of the site.
In the photo you can see what the seeds of wisteria look like:


How to germinate - step by step instructions
- Collect the ripe wisteria pods.
- Lay the beans to dry in a warm place.
- After drying, part of the pods will open, select the seeds.
- Treat seeds with 1% potassium permanganate solution. Dissolve 1 g of potassium permanganate in half a glass of water.
- Observe the dosage of the solution, use the balance or buy in the packaging.
- Dip the seeds into the resulting solution for 5-7 minutes. Put the seeds on a dry surface.
- If you bought seeds in a store, carefully open the packaging, sort whole, deformed ones, remove. Treat in the same way as manually harvested seeds.
- Take a jar with a screw cap. Pour the prepared soil into the jar halfway, moisten the substrate, put the seeds, mix, close the jar and place in the refrigerator in the vegetable compartment.
- Check the seeds once a week.
- After 2-3 weeks, the seeds will “hatch.” Proceed to landing.
- There is another way to “peck”: put the seeds in moist gauze, removing from light.
Seed from China - Pros and Cons
It is not always possible to collect the seeds of the desired variety yourself. Then make a purchase in the store or order online from China.Pros:
- Large selection of seeds.
- Price: the cost is lower than in the store.
- Convenient: an order is issued in a couple of clicks.
Minuses:
- Due to transportation, the seeds are deformed, this affects the germination.
- If the packaging is not tight, the seeds will become damp, moldy. To save such material is almost impossible.
- Make each seed variety a separate order. It happens that the grade is not indicated on the package, there is a chance to mix up the seeds.
- Low seed germination compared to hand-picked.
How to plant?
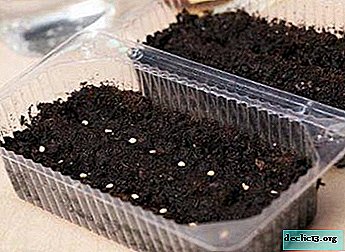 Choose a capacity for seedlings.
- Treat the container with potassium permanganate in the same composition as the seeds.
- Put a drainage of 2-3 cm thick on the bottom of the container. Expanded clay is suitable.
- Pour the prepared soil, leaving 2 cm from the top of the pot.
- Gently hatch the seeds in a horizontal position on wet soil. Add earth to the edge of the container.
- Sprinkle with a small layer of sand.
- Spray the ground from the spray gun.
- Cover with foil containers, put in a dark place. Air temperature + 22-25 ° degrees.
- Wait for emergence after 3-4 weeks.
- A week after the emergence of seedlings, move the containers closer to the light.
 Choose a capacity for seedlings.
Aftercare Recommendations
To grow strong seedlings, you need to properly care for seedlings at first after landing. We will tell you how to care for seedlings, so that it grows well, and then quickly bloomed.
- Seedlings in containers are grown under a film on which condensation forms. Take off the condensate, otherwise the seedlings will be affected by the fungus and it will die.
- Dive seedlings as soon as 2-4 full leaflets appear.
- Dive carefully, otherwise you risk damaging the root system.
- Water 2-3 times a week. Soil after watering is moist, but not wet.
- Observe the light mode: from the shade, gradually move to the light, avoid direct sunlight.
- In early spring, take the seedlings out for a couple of hours outside. So the young is tempered. Air temperature - not lower than +20 degrees.
- In spring, seedlings can be planted in open moist soil, for this, prepare the soil, make holes 50 by 50 cm, transplant with an earthen lump.
- In open ground, feed seedlings with mineral fertilizers, following the instructions on the packaging. For winter, cover with sawdust or fir branches.
- If the wisteria is shrubbery and is intended for growing in the house, it is necessary to create favorable conditions for its maintenance: loose nutritious soil, sunbathing 5-6 hours a day, proper watering without waterlogging, ventilation (avoiding drafts), plant transplantation as it grows.
What to do if the plant does not take root?
If the wisteria does not take root, then care mistakes have been made. Consider typical situations.
- Wrong place and lighting: wisteria loves space, light, needs 6-hour sunbathing daily.
- Swampy soil saturated with lime: transplant the plant into suitable soil!
- The plant dries and withers: spray the plant, after an hour, pour water with purified filter water.
- Wisteria is affected by pests: inspect the plant, conduct therapeutic spraying.
- An adult plant does not bloom: during propagation by seeds, mistakes were made when diving leaflets.
- Leaves turn yellow: feed the plant with iron salts.
Growing wisteria from seeds at home is easy. Follow the recommendations, follow the step-by-step instructions, and the wisteria will reward the heavenly lush flowering!
Watch the video: GROWING WISTERIA FROM SEED HOW TO PLANT WISTERIA (January 2025).


-
How to correctly adjust the office chair, the procedure
A sedentary lifestyle and so causes a lot of health problems. If, with constant sitting work, a person is in the wrong position, the development of serious diseases of the spine will be added to everything else. You can prevent the problem by choosing comfortable furniture and customizing it "for yourself." ... -
-
-