Growing orchids from seeds at home: all the nuances of the procedure

Orchid is a fabulously beautiful flower that has won the hearts of experienced gardeners and ordinary connoisseurs of the beautiful.
She is quite capricious in growing, but proper care and favorable conditions give an excellent result.
Obtaining orchid seeds is an even more complex process that requires certain knowledge and skills. Let us consider this question in more detail - you will learn how seeds look, how to prepare a nutrient medium for them.
What do seeds look like?
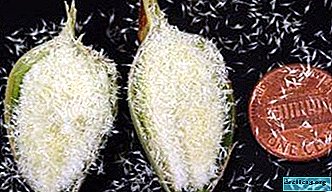
Is there an orchid seed? Yes, but very small. They are in the seed box, which contains up to about 4 million pcs. seeds in each, and represent the smallest yellowish dust. For a visual comparison, it can be noted that 15 thousand times less than an orchid seed.
A feature of orchid seeds is that they cannot germinate in the usual environment for other plants - the soil. This is because they do not contain endosperm.
REFERENCE! The seed material has practically no reserves, therefore, the embryo needs a nutrient substrate for development. In the wild, an orchid develops in symbiosis with mushrooms.Photo
Look at the photo, what the seed looks like:


How to distinguish fake from real?
Since obtaining orchid seeds is a very complex process, requiring laboratory conditions in most cases, many gardeners prefer to buy them. However and buying seeds - a serious matter, growing orchids, they say, requires the right approach. Consider the main aspects that you need to pay attention to when buying orchid seeds:
- Manufacturer (seller). It is best to buy seeds in large specialized stores that have a good reputation.
- Price. Undervalued prices often signal substandard material. But one should not forget that the high price is not a guarantee of quality.
- Packaging. The bag with seeds should be neatly glued, the text on it should be readable. The following information should be indicated on it:
- name and contact details of the manufacturer;
- the exact name of the culture (according to the Register);
- GOST;
- weight in grams;
- batch number;
- shelf life.
When making a purchase online, it is not easy to comply with the above rules. First of all, you need to pay attention to the reputation (company or store) that offer seeds.
Very often unscrupulous sellers under the guise of orchid seeds sell seeds of completely different plants, sometimes even weeds.
Is it possible to plant and grow a flower in this way?
It is possible to grow an orchid from seeds, but this is a very complex and laborious process. Sowing should be carried out under sterile conditions., which can often be achieved only in laboratory conditions.
Where and at what price are they sold?
 Orchid seeds can be purchased at specialized stores that sell seeds.
In addition, on the expanses of the World Wide Web, there are many ads of flower online stores that offer to buy orchid seeds. Their price depends on many components: manufacturer, grade, packaging material, etc. However, the approximate price for packing orchid seeds, which contains 20 pcs., Ranges from 180 - 250 rubles.
China production
Currently very often beginner growers grow orchids from seeds purchased in China. On the world-famous trading platform, hundreds of offers for the sale of orchid seeds at a low price. As a rule, bags in which 100 pieces are offered. seeds at a price of about 50 rubles. for every.
When ordering such seeds, you need to understand that the probability of getting good seed is reduced to zero. Very often, seeds of other plants are sent in such bags.
Sometimes this is understandable even before emergence - the seeds in bags turn out to be large, completely different from orchid seeds. But nevertheless, it is realistic to order quality seeds in China, it is only important to consider all possible risks.
Self receipt
Orchid seeds are not always pollinated independently. To get seeds from them, it is necessary to conduct pollination. It is done at a time when the flowers have fully blossomed. Let us consider this process in detail:
- Remove the duster with tweezers, which has a bright orange color.
- To clear it of a film.
- Attach to the anther of another flower.
Maturation of the seed box occurs within 3 to 8 months. To prevent the seeds from scattering during cracking, after 3 months you should put a bag of breathable fabric on the box. Before this, the bag must be boiled.
Cons and pros of growing with this method
The disadvantages of growing orchids from seeds include the following aspects:
 Increased demand for orchid seeds to the substrate and "sterility".
- The complexity of the process.
- Long growing period.
- The risk of acquiring low-quality seeds.
 Increased demand for orchid seeds to the substrate and "sterility".
Despite the listed disadvantages, in the cultivation of orchids from seeds, you can find the pluses. Florists get true pleasure by growing a plant from seeds, observing all stages of its growth and development. For them, all the hardships and minuses of this process turn into pros.
TIP! Growing an orchid from seeds, it is worth considering that a flowering plant can be seen only after 5 - 6 years.How to plant?
Next, we will focus on planting orchids at home.
Inventory and its sterilization
Before sowing seeds, you need to take care of the availability of the necessary equipment:
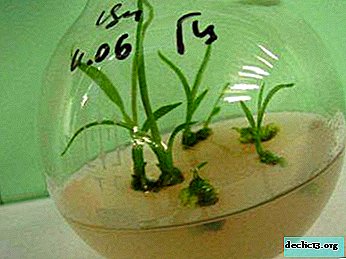
- Glassware. For growing orchids in a closed system, it is best to use conical glass flasks (200-300) ml. How to choose a container for growing orchids, read in our article.
- For flasks, it is necessary to purchase rubber plugs with holes for tubes, which will subsequently be filled with cotton wool. You can make corks yourself. To do this, take a cotton swab and wrap in gauze (2 - 3 layers). Here we talked in detail about the features of orchid cultivation in a flask here.
- Oven (pan) for sterilization. To do this, it is necessary to preheat the oven to 120 - 130 degrees and put the inventory there. Stoppers must be wrapped in foil before sterilization.
Seed Extraction
Seeds from plants are extracted as the seed box ripens. After pollination, it matures within 3 to 8 months. As mentioned above, after 3 months it is necessary to put on a bag of tissue to prevent the loss of seeds when the box is cracked.
It is necessary to let the seeds ripen well. Early removal of the box is fraught with damage to the seed.
Culture medium
For planting orchid seeds using Knudson's medium, prepared according to a special recipe. It includes:
 potassium phosphate;
- iron sulfate;
- magnesium sulfate;
- manganese sulfate;
- ammonium sulfate;
- calcium nitrate;
- sucrose;
- agar;
- distilled water.
 potassium phosphate;
To prepare it, follow the instructions:
- Prepared agar-agar pour 200 ml of distilled water.
- After swelling, place the container in a bowl of boiling water.
- After complete dissolution of the agar add the remaining components.
After that with the help of a litmus test you need to check the acidity. For orchids, the optimal level is from 4.8 to 5.2 pH. To obtain this level of acidity, add 2 drops of diluted acid (nitric or hydrochloric) to the prepared solution, and then check the pH again. In conclusion, you need to heat the mixture again for germination in a water bath, stirring constantly.
Next, you can watch a video where you will see the preparation of a nutrient medium:
Preparatory stage
The prepared solution must be poured into the flasks (to a height of not more than 1.5 - 2 cm), and then corked with a lid and allowed to solidify. The substrate should not get on the walls of the flasks, as this threatens the formation of microorganisms. After solidification of the substrate, the flasks are placed in a preheated to 120 - 130 degrees oven for 1 hour. Before this, the lids of the flasks are wrapped with foil.
Sowing
Before sprouting a flower, you need to sow the seeds, which consists of the following steps:
- Disinfection in bleach. To do this, 15 g of bleach and 100 ml of water are mixed, and then passed through filtered paper. Seeds are placed in the solution for 10 minutes.
- A grid is placed in a pot of boiled water.
- Flasks are installed on it and the lids are uncorked.
- Using a sterile pipette, the seeds are transferred to flasks.
- Capacities are closed by covers.
Seedling Care
Within a year after sowing, seedlings need to be transplanted into a regular substrate. A substrate made of fern roots, sphagnum moss, pine bark is perfect. Transplantation should be carried out as follows:
- Before transferring seedlings, pour the substrate with boiling water for half an hour.
- Pour some water into the flasks and gently "pour" the seedlings into a container with foundationazole.
- Transfer the seedlings to the substrate with tweezers with a rubber tip.
Possible problems and difficulties
There may be many difficulties in growing a house. First of all, it is very difficult to obtain orchid seeds on your own. However, to acquire high-quality planting material is not always easy. And since growing orchids from seeds requires sterility and even laboratory conditions, the death of seeds or seedlings can occur at any stage.
So, since the orchid is very capricious, and its cultivation from seeds is even more difficult, you need to think carefully whether it is worth doing at home. If the decision turns out to be positive, then all the rules and recommendations must be followed, and then the efforts will not be in vain. Despite all the difficulties, the orchid is everywhere grown by flower growers and pleases the eye of others.
Watch the video: Monteverde Coffee Tour (January 2025).


-
Kavala - a picturesque city of Greece with a rich history
Tourists come to the city of Kavala (Greece) not only for a lazy beach holiday. There are historical sights and monuments of architecture, museums and night clubs. Only after seeing Kavala in the photo, many choose the city as their vacation destination. And Kavala is characterized by a comfortable climate - it is hot in summer, and the sea heats up to 26 degrees, you can safely take children to rest, and in winter it is not too cold. ... -

-
-