How to choose a pot for transplanting orchids at home and what you need to know about the procedure?

Orchid is an exquisite tropical plant of indescribable beauty. Of course, such beauty requires special care.
When growing orchids at home, regular transplantation of the plant is necessary to maintain its healthy state. In our article, we will consider in detail the process of transplanting this exotic flower, what kind of soil the plant needs and how not to damage it during the procedure of its delicate roots. It will also be interesting to see a useful video on this topic.
About the process in general
Although a regular orchid transplant is necessary for the plant’s healthy state, anyway it’s always stress for the flower. And stress is the cause of plant diseases. therefore do not transplant an orchid very often, just a couple of three times a year is enough. And best of all do this during a period of active plant growth.
We told you about when it is best to transplant an orchid at home and what season of the year here, and from this article you will find out whether it is possible to transplant a flower in the fall.
Why is it necessary?
 Everything is just the soil in which your plant is located, over time, it is depleted and loses its characteristics important for the plant (the level of acidity decreases, the balance of mineral salts is disturbed, air permeability worsens). And also an important fact about the picky-orchids - they do not like for a long time is in the same environment.
As we said before transplant is stress for the plantTherefore, you need to minimize the undesirable consequences of the transplant. To do this, be extremely careful and follow the rules of transplantation.
When is it important to transplant a flower?
Briefly consider the reasons for the transplant:
- Depletion of the soil - if you see that the soil is donkey, crumpled, a lot of free space has formed in the pot.
- You hear the smell of rot, dampness and the leaves of the plant began to turn yellow.
- After watering, the container became heavier than usual.
- Orchid roots are darkened or have a brownish tint.
- If rotten roots are detected (healthy ones are green).
- The withered appearance of the plant.
- Pest insects appeared (aphids, thrips, scale insects, nematodes and others).
- The roots of the plant do not fit in the pot.
About whether it is possible to transplant an orchid, if it blooms, when necessary and how to do it right, read here.
Preparation stages
To move a flower to a new house, you need to carefully prepare. This will reduce the negative effects of the transplant and reduce stress on the plant. We outline the following stages of preparation:
 Tool preparation.
- Preparation of materials for transplantation.
- Preparing a plant for transplant:
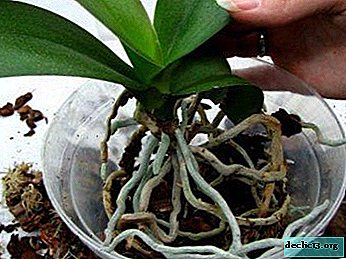
- We take out the orchid from the pot - stretch the pot and lightly hit the bottom (if the roots have grown to the walls, draw along the edge of the pot, separating the earthen lump from the walls or carefully cut the old pot).
- We remove the old soil from the roots of the plant.
- Clean the roots - disinfect the scissors with alcohol and cut off the dead parts of the root, sprinkle the slices with charcoal (how to preserve orchid roots during transplantation, can they be cut and how, we told in this material).
- If there are pests in the roots, put the orchid in a bucket of water and the insects will die quickly.
- Preparing a container for a flower transplant - we are preparing a new pot - it should be plastic, have a hole to remove excess moisture. At the bottom we put drainage (allows you not to accumulate water).
 Tool preparation.
Tools and materials
- New larger plastic pot.
- A sharp garden knife or pruner.
- Transplanting soil (pine bark, peat, sphagnum moss).
- Drainage (use small gravel or expanded clay).
- Sticks for fixing a peduncle (required from natural materials: bamboo, pine wood chips).
- Charcoal (for processing slices).
- A solution of an insecticide for treating roots (if they were affected by parasites).
What natural components to use instead of artificial ones?
In the process of transplantation, it is better to use natural materials, not replace with artificial ones.
Only drainage materials can be replaced. Natural materials: river pebbles, river sand. They can be safely replaced with artificial materials - polystyrene balls or expanded clay.
Pot selection
Pot requirements are as follows:
 The size of the pot should be 3-5 cm larger than the previous one.
- The best pot is plastic (they also use glass - they certainly provide a lot of light, but they significantly complicate the watering of flowers, clay pots are allowed - but on the contrary they do not let light in).
- The pot must have several vents at the bottom (to remove excess water).
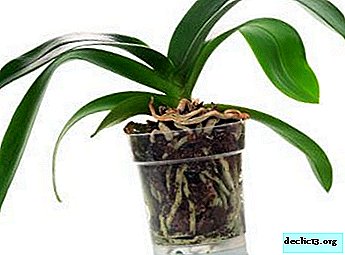
- It is best if the pot is transparent. so the roots will be visible and it will be possible to monitor their condition.
 The size of the pot should be 3-5 cm larger than the previous one.
We buy soil or make it yourself
Tips for choosing and preparing the soil for orchids:
- Special primer can be purchased ready-made in the store, or can be easily made independently.
- It must necessarily be based on the bark - it happens in small, large and medium fractions, for the orchid the last is necessary.
- For self-mixing you need: pine bark, sphagnum moss or peat and expanded clay (like drainage) in a ratio of 3: 1: 1. For 1 liter of such a mixture, add 2 g of lime.
- What kind of bark is needed? We must take bark from dry fallen trees or collect around pines.TIP: Collect the bark with a knife, disinfect before use, grind to 2 cm, boil for 30 minutes, dry.
- We use moss dry and lively. Cut with scissors into pieces of 5 cm, put dry in boiling water for 5 minutes, wring out, dry.
- We select peat with a coarse-fiber structure.
Watch a video about making soil for an orchid with your own hands:
Step-by-step instruction
The process of transplanting an orchid into another pot consists of several stages:
- We extract the plant (previously we described this process).
- We remove the old soil from the roots (described earlier).
- We remove the dried and decayed parts of the root.
- We examine the roots and plants for pests (if any, we process from parasites).
- Dry the roots.
- We remove the yellowed and dried lower leaves (if any).
- We take a pre-sanitized pot and pour drainage into it.
- We lower the orchid in the middle of the pot and evenly fill the soil, evenly distribute it along the rhizome. If the plant has a lot of aerial roots, you should not try to fill them all with soil, just do not compress the soil too much, the roots will gradually fix themselves in it. But remember that the plant should not hang loose in the pot.
Watch the video about the correct orchid transplant:
Conclusion
This completes the transplant process. Your beauty is happy about the new home and is preparing to continue to please you with her flowering. If you always carefully and clearly follow these simple rules, as well as properly care for the orchid after transplantation, then your plant will always be healthy.
Watch the video: Repotting orchids, everything you need to know to keep them healthy and flowering my method (April 2024).


-
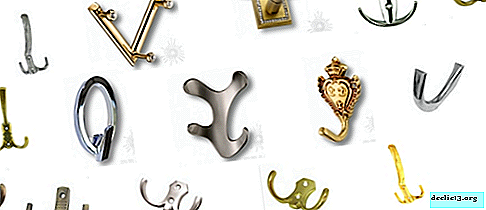
The nuances of choosing furniture hooks, their possible options and features
Any furniture is made from a large number of elements, which include not only the main parts of the structure, but also accessories. Furniture hooks intended for storing clothes or other items also belong to it. With the right choice and high-quality installation, they can withstand a significant load, so they are considered multifunctional and convenient to use. ... -
-

-