Rooting of flower leaves or how to grow violet in a pot of seeds?

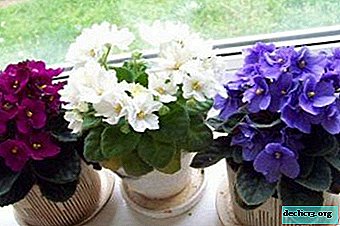
You can buy a senpolia and decorate your home with them, or you can grow them yourself. This is something special, the feeling when you begin to feel ownership of this beauty, when all the efforts and attention devoted to the task crystallize in the form of a very tangible result - a strong and harmonious plant that blooms for us to joy.
Violets are grown in a pot both from leaves and seeds. Read more about these methods in this article. Also watch a helpful video on the topic.
Which pot to use?
- The most optimal option is plastic containers. The reasons for this choice are that the soil retains moisture longer in a plastic pot than in a ceramic one, and the lower leaves of the plant, which, due to the nature of growth, almost lie on the edges of the pot, are prone to wilting and this forms ugly darkening on the clay surface .
- If you still really like to grow violets in earthenware, you can make a substrate for the halo of the lower leaves of sisal or coconut fiber, a piece of raffia is also suitable. You need to cut a circle, about a centimeter more than the diameter of the pot, and also cut the center of the substrate, a centimeter and a half more than the girth of the "bunch" of violets. To make the substrate look aesthetically pleasing, it is advisable to choose a color that is in harmony with the colors of the pot, or tone to tone.
- Violet feels good in a pot; it is three times smaller than the diameter of the outlet. With the increase in the diameter of the outlet, the width of the pot should also be increased.
- There is such a feature here that the senpolia begins to bloom poorly if the pot is more than ten centimeters in diameter. Therefore, if the violet has grown, it is better to do the rejuvenation procedure by removing the largest leaves.
- When using an old pot, rinse and disinfect it.
- There must be holes in the bottom to remove excess moisture.
Watch the video on choosing the right violet pot:
Growing Saintpaulia from seeds
 Getting a violet from seeds is a time consuming task that requires attention and patience., but the special joy that arises when you get the result is worth all the effort and time.
They are purchased in special stores or through an online order. But if there is interest in going through the whole process of creating a new senpolia, then it will make sense to make pollination yourself and extract the seed material. Another advantage of seed cultivation of Saintpaulia is that you can get a new type of coloring and shape of leaves and flowers. To do this, you need to do pollination using a pestle and pollen from the stamens from different varieties of violets (see what varieties and types of violets are here).
TIP: The best option for seed propagation is growing from fresh seeds.Favorable time for sowing is considered from August to October. If seeds are purchased in winter, then sowing is recommended in February-April. But there are varieties that lose their ability to germinate if they are sown at a bad time, for example, fragrant violet emerges only from autumn sowing.
Pollination and Extraction
- Using a toothpick, you need to move the pollen from the stamen to the pestle.
- After a minimum of a week, and a maximum of ten days, if everything went well, an ovary should form.
- Seeds ripen in the ovary, or as it is also called, a hybrid box, six months or within a seven-month period. By the time of full ripening, the box dries. When it dries completely, they cut the flower with the ovary and leave it in the dark from ten days to half a month.
- After that, seeds are scattered on a white paper sheet, opening the ovary box with a needle and tweezers.
Where to plant?
An ordinary plastic container is best for growing seedlings.. You can purchase a special container for seedlings, or you can, in order to save money, use a one-time container for products.
Usually they take the popular and well-proven Violet soil. But you can prepare the soil mixture with your own hands:
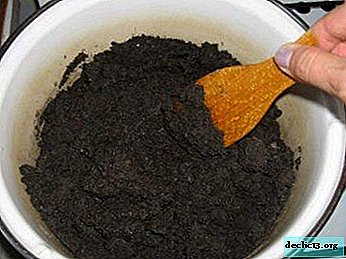 Recipe for self-made. Leaf (3 parts), peat (2 parts), turf (1 part) and coniferous (1 part) soils are mixed. Add something for loosening (crushed sphagnum, perlite or vermiculite). A small amount of charcoal will not hurt.
- Another option is to take one part of coniferous and soddy soil, add one part of peat and chopped sphagnum, mixed with a couple of parts of leafy soil and half of the sand. The introduction of a small amount of charcoal will play the role of a sorbent and at the same time fertilizer, since it contains K, Ca and F, carbon also acts as an antibacterial ingredient.
- The simplest soil recipe. Add sand and peat to the garden soil in a ratio of 4: 1: 1. Garden soil is taken from the beds where legumes were grown, and the best option is soil from mole heaps, which has optimal grain size, you can not even sift it. Peat is better to take on horseback, it is less black than lowland. Each component is sieved, freeing from plant fragments, so that their decomposition does not inhibit the growth of seedlings.
 Recipe for self-made. Leaf (3 parts), peat (2 parts), turf (1 part) and coniferous (1 part) soils are mixed. Add something for loosening (crushed sphagnum, perlite or vermiculite). A small amount of charcoal will not hurt.
The most important thing, the soil mixture for violets should be of moderate fat content, loose type. It is important that it absorbs moisture well, and the degree of looseness allows it to be well ventilated. Dense and heavy soils, the delicate roots of the senpolia simply cannot be mastered. You can vary the ratio of parts, achieving these important parameters of the earthen mixture.
Before planting, the soil is disinfected by steaming, freezing or using special preparations, for example, a solution of fundazole. To avoid fungal infection for sure, you can dust the seeds with fungicidal powder. This is especially true when using independently extracted components.
It will not be superfluous to use crushed sphagnum as a baking powder. This component, in addition to loosening properties, also has an antiseptic effect, being a natural antiseptic substance, resists fungi and infections, and increases the hygroscopicity of the mixture.
Watch the video on the preparation of the substrate for violets:
Sowing seeds and seedling care
 First moisturize and loosen the soil.
- Then a three-centimeter layer of soil is poured into the tank and easily leveled, without pressing down.
- Further not very deep grooves are made.
- Seeds are mixed in equal parts with sand.
- The mixture is poured into the recesses in even stripes.
- The container is tightly closed with a transparent lid or plastic wrap.
- They are placed in a well-lit place.
- Germination is best done in the light, so seed sprinkling with soil is not done.
- Temperature conditions: at first the containers are cool, 12-18 degrees, and when the first sprouts appear, the seedlings are transferred to a warmer place, 18-22 degrees.
- It is required to maintain moderate substrate moisture without excessive moisture. For this, the earth is regularly sprayed using a spray gun.
 First moisturize and loosen the soil.
The first violet sprouts are expected in twenty days. But some species of this flower can sprout up to two months.
- As soon as the sprouts become half a centimeter and the first leaves appear, you need to dive the plants.
- To do this, seedlings are dug using a toothpick, and planted at a distance of 1.5-2 cm in the soil mixture with the addition of fertilizing and charcoal.
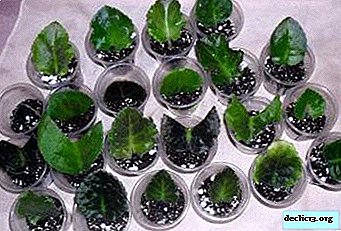
- When the kids grow up and begin to interfere with each other, one should pick again, planting them in plastic cups or in containers of several pieces, so that between the plants there is a distance of five to seven centimeters. Take glasses of 100 g, the container is also taken the appropriate depth. At this stage, the roots of the senpolia strengthen.
- There is also such a dive option - they are waiting for three pieces of paper and after that they immediately sit down at a distance of about 7 centimeters, making only a one-time dive.
They grow violets in this way until August-September, provided that the seed was planted in late summer or early autumn. When the violets grow, picking up leaves and volume, they proceed to the final stage - they are planted in pots. It turns out that the whole process from seed nucleation to an independent plant takes about a year. The first color of the senpolia, propagated by seed, is given in the second year of life.
Caring for a violet seedling is simple - moderation in watering and gentle gentle cultivation, feeding with complex fertilizer of mineral type in the form of a solution, 10 g per 3 l of water.
Watch a video about growing violets from seeds:
The nuances of care
 Violets adore the light, but direct sunlight is harmful to them.
- They love moisture, but they are afraid of draft and cold, they do not favor temperature changes.
- Cold watering and water getting on the leaves are unacceptable.
- Excess moisture will destroy the plant.
- Saintpaulia loves nitrogen, grows poorly and blooms when it is lacking.
- Feeding is carried out with mineral fertilizers, once every 14 days.
- Comfort humidity 50%.
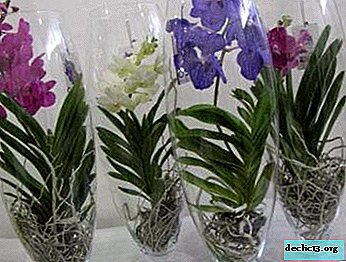
- The foliage cannot be in contact with the glass.
- Regular removal of withered, dried flowers and leaves with damage is required.
- Watering is carried out as the soil dries.
- When the seedling is transplanted into a separate pot, it is necessary to fill in the drainage layer of perlite, moss or small expanded clay balls (learn about plant transplantation rules here).
- It is important to keep to the optimum depth. The lower leaves should be located just above the soil layer, and the growth point is equal. A buried violet does not grow well and is susceptible to decay, and a high-set violet looks ugly, blooms problematically (about why the violet may not bloom and how to deal with it, read here).
 Violets adore the light, but direct sunlight is harmful to them.
More nuances about caring for violets at home can be found in this material.
Growing from leaves
Usually propagated Saintpaulia with leaves. Cut them from the plant that attracted. This is the easiest and most effective way. The most favorable and correct period for the propagation of violets with a leaf is the spring and summer seasons, when it can be grown fully and effortlessly.
The choice of leaf is very important, the success of the whole event depends on this in many respects:
- The leaf should not be sick or weak, since the plant in the future will also be unviable.
- Too small a sheet will not fit.
- A leaf from the lower tier, located right next to the soil, is not desirable; pathogens often nest there, and the leaves themselves are mostly old and sluggish.
- An elastic sheet of normal color and size is ideal, cuttings from the third and second tiers will fit most.
- It is important to regularly water the plant before taking the cuttings.
Long road and poor watering of the mother plant are bad for the landing leaf. To compensate for these problematic moments, you can put a leaflet in warm water for a while, with a small addition of margagnac, until a little pink. When the stalk is restored, it needs to be cut, leaving 3-4 centimeters from the base.
There are two main methods of rooting violet leaves - this is rooting in water and land.
How to root in water?
The advantages of the method are that it is possible to observe the roots, timely preventing putrefacts and accurately determining the time of planting in a permanent place:
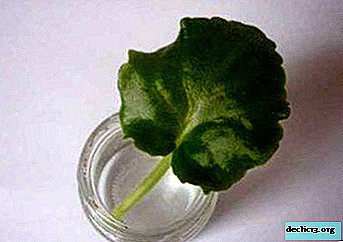 You will need a small glass cup or a dark dark medical bottle, this will reduce the water pollution by algae fragments.
- It must be washed and sterilized with boiling water.
- Fill with boiled water. Go boiled.
- The sheet needs to be deepened into a bubble by one and a half to two centimeters. The slice should not touch the walls and day, therefore, fix the lid with a hole made in the center.
- Activated charcoal, one tablet, can be put into water from microalgae.
- You should monitor the water level, as it will be absorbed by the sheet and evaporate, adding liquid in a timely manner.
 You will need a small glass cup or a dark dark medical bottle, this will reduce the water pollution by algae fragments.
The roots are formed after a couple of weeks, or even after a month, it depends on the cultivar of Saintpaulia. When rot appears, the leaf is removed, dried and damaged areas are removed.. Slices are powdered with activated carbon powder.
Watch the video on rooting violet leaves in water:
When is the time for planting in the soil and how to do it?
They grow it in glasses made of plastic or in small pots with holes for draining excess water:
- A third of the pot or glass is covered with small type drainage.
- Then pour prepared, loosened and moistened soil to the very top.
- The cuttings are superficially introduced into the topsoil.
- Around the stalk, the earth is carefully compacted so that it does not roll sideways and fall.
- Make a mini-hotbed by loosely covering the container with a violet leaf with a plastic bag. Periodically, it is required to ventilate it so that the soil is not covered with mold.
- The little boy is needed until the kids appear. This is a sure indicator that the process of growing from a leaf has become a reality.
- Children are seated in different pots.
The remaining nuances of care, soil mixture, etc. do not differ from the above, in the section on the seed method of reproduction.
Details about the department of children
Rosettes appear near the base of the handle.. They are divided based on the following principles:
- at least a pair of leaves per plant;
- small root for each individual;
- To make the separation less traumatic, you need to moisten the soil, and remove the stalk from the ground.
How to root in the ground?
IMPORTANT: It is believed that this way the plant takes root faster, the risks of decay are much less, and more children appear.A special soil with baking powder is required, it is sold as a special mixture. You can simply mix vermiculite and perlite in equal proportions without adding nutrient soil. Perlite helps air penetrate the roots, and vermiculite absorbs moisture.
 Gently break off the stalk by moving it away from the plant.
- Cut the leg obliquely or at right angles.
- Then dip for three seconds in a slightly pink solution of magenta.
- Leave to dry for half an hour.
- Next, a plastic cup is covered with a slightly moistened mixture.
- Enter the leaf leg into the ground and compact so that it does not fall to one side.
- Make a mini-greenhouse according to the method described above.
- On the day of planting do not water.
- First, the leaf will fade, this is normal. When the first roots appear, the turgor of the leaf will be restored. Watering is done once every seven days, very moderate.
- Do not fertilize, since this factor will make the leaf more likely to grow roots in the search for food.
 Gently break off the stalk by moving it away from the plant.
Watch the video about rooting violet leaves in the ground:
Possible diseases
If the senpolia is unpretentious in leaving, then in terms of diseases it is quite problematic. The plant has delicate stems, therefore it is especially vulnerable to aggression of a diverse number of pests. The most common fungal lesions occur are powdery mildew, treacherous late blight, dangerous fusarium, gray rot and rust.
Common causes are a lack of light or direct exposure to the sun, excess or lack of nutrition, temperature extremes, drafts and cold, excess watering, too large a pot. More nuances about these and other lesions of the flower and methods of dealing with them can be found in this article.
Powdery mildew
Difficult white plaque on the leaves. Predisposes to the appearance of powdery mildew. High humidity and cold contribute to this. Saintpaulia is treated with alternating preparations of baytleton, topaz and saprol.. You can powder the leaves with sulfur powder, then briefly cover the Saintpaulia with a plastic bag.
Insidious late blight
Blight violates the surface of the stems, giving a brown tint. The leaves begin to fall off, the trunk is exposed. This is the action of a fungus that penetrates through the affected areas to the roots.
It is important to start treatment in a timely manner, otherwise the senpolia will die in the shortest possible time. The violet must be removed from the pot and the affected parts of the root system removed. They have a brown color.
If the fungus has eaten the entire root, you need to leave only the stalk and then follow the instructions for rooting the leaf in water. Soil and pot for planting the cuttings to take a new.
Dangerous Fusarium
The fungus that affects the violet in this case is called Fusarium. Leaf petioles and roots rot. Petioles begin to turn brown, and the roots darken and separate from the soil. As both treatment and prevention, you can water the plant with fundozole. The dried up ground parts and decayed roots are removed.
The reasons for the main technical plan are a large pot, temperature differences, cold watering, heavy soil.
Gray rot
 Fluffy plaque, in brown-gray tones on the flowers and foliage - this is a botritis fungus. It can multiply in a short time and destroy the senpolia.
Usually, infection occurs from plant fragments in the soil, spores can be in any form of soil, infection occurs rapidly. Therefore, do not neglect disinfection of the soil.
The brown parts are removed, the affected areas are dusted with fungicide powder. The plant is transplanted into new soil and a pot.
Factors that provoke infection - excessive watering and temperature differences.
Rust
The initiators are rusty fungi. Yellow-brown tubercles appear on both sides of the leaf. Increased humidity and water on the leaves during irrigation create favorable conditions for the maturation of spores.
Leaf spots are not always a symptom of this disease.. They can appear with a lack of light, excessive feeding, from drafts or direct exposure to the sun.
Conclusion
As they say, you can’t easily take a fish out of a pond. The same is true for a violet darling, because in order to grow even such an unpretentious plant you will have to make some efforts and we hope that we could convey how. And she, in turn, will thank with flowering, will create coziness and joyful mood in the house.
Watch the video: How To Grow Water Lily From Leaf WITH UPDATES (January 2025).


-
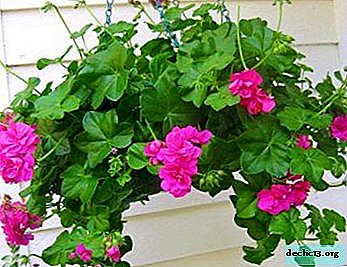
What home care does ivy geranium need for spectacular flowering?
The ivy or, as it is also called, ivy geranium is a home plant that can grow both on the balconies and window sills of apartments, and in the country. The flowers of this type of geranium are quite bright and have a very attractive cheerful appearance. However, in order for the flower to please its beauty, it must be carefully taken care of. ... -

-
-