Description of all methods of propagation gloxinia and the rules for subsequent care of the flower at home

Gloxinia is a flowering plant. It has very large leaves, which are great for vegetative propagation.
Gloxinia belongs to the family of gesneriaceae, is a grassy undersized plant. The homeland of this beauty is hot Brazil. About 50 gloxinia species are represented in nature.
Do you need young gloxinia? Proper care at home for gloxinia and competent reproduction with the instructions in the article will help to get a young flower without resorting to the services of a flower shop.
Description
Keeping gloxinia at home is not difficult, but there are specific requirements.. Therefore, not all its varieties can live in an apartment. Gloxinia grown at home can have about 20 large inflorescences that bloom simultaneously.
The diameter of one flower can be from 7.5 centimeters in diameter. There are simple and double flowers in texture, in shape they can be slightly wavy or straight, and there is also a wide variety of colors. This is due to the presence of a huge number of varieties.
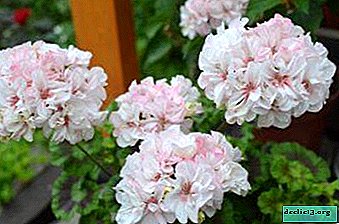
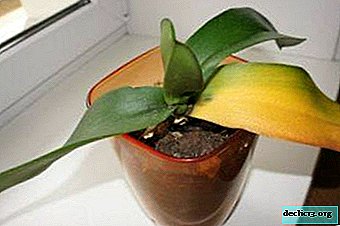
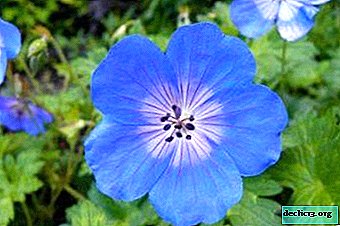
Photo of a houseplant
Below you will see beautiful photos of the flower.


How to propagate correctly at home?
Since gloxinia propagates by a large number of methods, we can safely say that plant propagation takes place all year round. Each individual method has its own time period. Next, we will consider each of them individually.
For any vegetative division, use a sharp disinfected tool.
Tuber division
In the spring, during the formation of new buds on tuberous roots, it is necessary to select the largest of them with a sharp tool, a knife or a scalpel, and carefully divide it into parts.
IMPORTANT! Each lobule should have a living kidney. Places of slices sprinkled with crushed activated carbon or wood ash. Each part is left to dry for a while, and then placed in an individual pot.By dividing the tuber the least stressful for the plant and, therefore, a flower that has appeared can produce buds in the same year closer to summer.
You can also see how to propagate gloxinia by dividing the tuber, in this video:
Rooting sheet
Reproduction gloxinia leaf cuttings or parts of the leaf is considered the least troublesome and most successful. Here you can apply several methods.
Take young leaves only at a time when the flower is picking up buds. The length of the petiole in this case is 3-4 cm.
You can read more about the reproduction of gloxinia leaf here.
In water
Instruction:
- Put the stalk with a leaf in boiled water.
- After the roots appear, plant the leaf stalk in a container with earth, or, for convenience, in a peat tablet.
- Next, to create a greenhouse effect, place the container in a clean plastic bag.
- When new leaves appear on the shoot, the shelter is removed, and the old sheet should also be removed.
In the ground
 Not always pre leaf leaf should be rooted in water. Experienced gardeners are convinced that the gloxinia leaves are well rooted if placed immediately in the ground.
How to root in the ground:
- Choose the soil. The structure is better to take loose soil, which will pass water well. You can buy ready-made in a flower shop.
- It is recommended to lower the cut section into the solution of any root growth stimulator.
- Make a hole in the ground, lay the sand. Then place the stalk obliquely to a depth of 1.5 cm, fix it with soil.
- Cover a container with a leaf or a glass jar planted on top.
- Create shelter from a bag or glass jar.
- Shelter must be removed after the appearance of young leaves and the formation of nodules on the handle.
Similarly to these 2 methods, you can even root glossy parts of the sheet.
You can also see how to propagate gloxinia with a leafy stem, in this video:
Cuttings
For reproduction, not only leaves are successfully used, but also stem cuttings, sometimes also apical, i.e. chopped from a non-flowering shoot. In this case, the rooting and planting procedure is similar to the method of leaf propagation.
 A distinctive feature is the correct selection and cutting of cuttings. Since the stem at gloxinia is short, it is artificially stimulated to lengthen - the pot with the plant is moved into the shade for about 3 weeks, and when the stems are extended, cuttings are cut.
After hibernation, the tuber, as a rule, releases young shoots. It is advisable to leave a few new shoots, and the rest, not placing in a glass with water, immediately root in a peat tablet or in a nutrient mixture.
The advantages of this method of propagation gloxinia is that it will bloom in the same year.
You can also see how to propagate gloxinia with stem cuttings in this video:
Flower stalk
This is the most difficult way to breed gloxinia. To begin with, we’ll figure it out: flower stalk is a leafless shoot on which an inflorescence is located.
Firstly, it is necessary to carefully cut the peduncle and place it in a container with a small amount of water about 1-1.5 cm tall. Now you should wait for the first roots to appear.
Do not worry about the fact that the roots are slightly curved. This can even play a positive role: in this way several nodules can be formed.Next, the peduncle is placed in the ground similarly to leaf propagation.
Seeds
From November to February, gardeners recommend gloxinia propagated by seed.. Seed is planted in wide containers. As the soil, sheet land with the addition of river sand is used.
Gloxinia seeds are sensitive to light and germinate only when it hits the surface. Therefore, we strongly recommend not to deepen the seeds when planting, but only to sprinkle the material on top of it.
 It is necessary to provide shelter, for example, with glass and observe a temperature regime of 22 degrees. After 14 days, the first gatherings should appear.
After the shoots have gained 3-4 leaves, you should grasp the plantings. In a new place, young plants place them at a distance of two centimeters from each other.
The next time the pick is carried out when the third pair of leaves appears, increasing the distance to 5 centimeters. For the third time, planting dives already when there are well-developed leaves - seedlings are placed in a more spacious pot.
Plants are located at a distance of 10 cm. The beacon for planting young plants at a constant place in individual pots is the moment when they begin to come into contact with leaves. Pots should be selected at least 12 centimeters in diameter.
With proper care, after about 7 months, flowering can be expected.. However, do not forget that the method of growing gloxinia from seeds is recognized to be far from simple, unfortunately, it is not always possible to bring it to the end. It depends on many factors, for example, seed germination. Therefore, you should choose fresh seeds for planting.
You can also see how to propagate gloxinia seeds, in this video:
Possible difficulties
The main difficulty that occurs during the vegetative propagation of gloxinia is that it is not possible to root any type of shoot. In this case, before planting in the soil, the planting material must be treated with a special solution that stimulates root growth.
Another problem that occurs when part of the tuber reproduces is its rot.. Here the reason is obvious, the water stagnated in the pot. Therefore, it is extremely important to ensure high-quality drainage and observe the irrigation regime.
How to care for a young plant?
 First, you must remember that this plant is photophilous, but in the open sun, gloxinia can get burned. Therefore, in the house you need to find a place with the most diffused light, obscure or remove it from the active sun.
The best place to keep gloxinia is an artificially lit shelving. The correct light mode and protection against drafts will help your plant to form a small, neat rosette and bright beautiful flowers.
Secondly, it should be borne in mind that young plants, as a rule, are not cleaned for the winter, so they are stretched. Such leaves are cut to the first pair, counting from the ground, and later new flowers appear from these sinuses.
Thirdly, at the beginning of growth, gloxinia should be watered very delicately. First, a small amount of defended water, then gradually increasing its volume. Be sure to ensure that water does not fall on the leaves or in the center of the tuber.
You can read more about watering and fertilizing gloxinia here, and here we talked about how to properly care for it.
Conclusion
Today we talked about all the tricks of growing gloxinia in five ways. You just have to try! Having grown at least one gloxinia on your own, and waiting for its charming flowering, you will not be able to stop loving it.
Watch the video: Research Methods - Introduction (November 2024).


-
Rules for the care of dwarf pelargonium at home with a photo
Nowadays, such varieties of pelargonium as dwarf or miniature are becoming more and more popular. The secret of the demand for these plants lies in their unpretentiousness, compactness and external decorativeness. In the article, we consider the features of growing dwarf pelargonium, find out how to plant this plant, how to care for it at home. ... -
-

-