DIY crafts for New Year 2019

The children look forward to the New Year holidays and prepare for them, creating crafts from paper, plasticine, cones and other materials. This fun activity is fun. Adults also independently create decorations to transform the interior and fill the house with a sense of celebration for the New Year 2019. In this article I will share tips on creating New Year's crafts that will decorate the school, kindergarten, home and delight loved ones if you donate such a little thing.
The tradition of celebrating the New Year on the Chinese calendar was liked by the inhabitants of Russia, because the symbol of the year is the familiar animal with a pronounced character. It is nice to know that the whole year will be accompanied by a dear friend, for 2019 - this is the Earth Yellow Pig or Boar. It is also interesting that the color of the symbol also changes, the previous cycle was red, aggressive, and now it is time for calm, yellow and green dominate.
Open books of fairy tales about animals and read about the three asking or the Grimm brothers about a cunning pig. There is a beautiful tale by Hans Christian Andersen about a piggy bank, and if you like oriental tales, you will find many interesting stories in Georgian, Abkhazian and Serbian collections. Smart, a little lazy, but such an enterprising pig is not in vain considered the most intelligent animal. Even horses and dogs cannot be compared with a wild boar, so that in 2019 the mind will dominate in everything.
After reading the tales, start creating beautiful crafts, among which we will take the main place to the piglet. There are a lot of materials for DIY crafts, you don’t even have to buy anything:
- Hanks of yarn.
- Old floppy disks.
- Counting sticks.
- Beads, bugles, sequins.
- Paper.
- Plastic bottles.
Will only have to buy crepe paper, glue and paint.
Step-by-step instructions for children's crafts to school and kindergarten
Kids like to create beautiful and vibrant crafts, but for a small child it’s problematic to choose a feasible task. I will share step-by-step instructions for creating Christmas crafts at home, which will help in creating a festive atmosphere and allow the baby to show creativity with the support of parents.
Christmas tree made of cotton pads

The list of Christmas decorations and Christmas-themed figures is led by the tree. To make a snow-white beauty, you will need cotton pads, multi-colored beads, cardboard, braid and some glue.
Manufacture
- The most difficult is the preparatory stage: the connection of cotton pads, playing the role of snow-covered needles. Take a disk, fold in half, then again in half and fasten with a stapler. Do the same with other drives.
- Assemble the frame. From a sheet of cardboard cut a large circle. Decide on the size of the figure in advance, because the radius of the cardboard blank determines the height of the finished product.
- Define the center of the circle and mark with a dot. Take a ruler, draw a line from the center of the circle to the edge and make a cut. Form a cone from the workpiece, fix the edges with glue.
- When the base of the Christmas tree dries, trim the lower part and glue the ribbon tape at the very bottom.
- Proceed to fix Christmas tree needles from cotton pads: stick to the base with a bend. Dress the beauty, row by row, to the very top.
- To decorate the Christmas tree, use bright beads. Glue on cotton needles in random order or in the form of a pattern imitating decoration. It remains only to decorate the Christmas tree with tinsel.
Optical disc mount
Surely in every home there are CDs that are suitable for creating holiday crafts. Decoupage technique will turn them into a wonderful pendant, which will serve as a Christmas toy or decoration on the wall. To make such a thing, you need a disk, glue, varnish, a napkin with a pattern, a ribbon and tinsel.
Step-by-step plan
- Take a napkin and gently peel off the festive pattern layer.
- Coat the surface of the disc with a thin layer of glue and stick a tissue.
- Using scissors, trim the edges of the napkin protruding beyond the disc outline.
- After the glue has dried, varnish the product and decorate it with tinsel along the contour.
- Tie a beautiful bow from a ribbon and attach a loop.
Bells
In many countries, bells are used for decoration: they are bought in specialized stores or made independently. The instruction will help to create such a masterpiece at home. You will need tape, twine, glue and a plastic bag.
Instruction manual
- Take two plastic bottles and tape the neck with tape so that you get a smooth working surface.
- Put plastic bags on the bottles, glue them and wrap them with twine.
- After the glue dries, carefully remove the bottles from the blanks, remove the bags.
- To decorate Christmas bells, use tinsel and glue with decorative sequins.
- Connect the decorated bells with a beautiful bow and attach a loop.
Festive lamp
This unusual paper craft is suitable for decorating a New Year's table. Stock up on thick cardboard, a small candle, white paint and sparkles.
- To make a lamp, make a cone out of cardboard, as in the case of a Christmas tree. Using scissors or an office knife, pierce several holes in the workpiece. If you make holes in the form of a pattern, the lamp will delight you with an intricate pattern on the walls.
- Treat the contour of each hole with zero sandpaper to eliminate roughness. Cover the body of the polished cone with paint in several layers. To make the craft look more effective, decorate it with sparkles.
- Place a small lit candle inside the Christmas tree. Rays of light penetrating through the holes will delight you with a fun game.
Crafts from sticks - fun and simple

You can buy regular sticks for counting at any stationery store. Pass by plastic products and choose only wooden ones, it is more pleasant to work with them. We will assemble a wide variety of crafts from such sticks, and if you purchased already painted sticks, you can collect interesting toys - Christmas trees, wells, snowflakes, houses of different colors, you only need glue. If counted unpainted sticks are bought, more paint or felt-tip pens will be needed.
Decorate finished glued houses, snowflakes and Christmas trees with beads, sequins, bugles, confetti or rhinestones. Crafts, even the same in form, will turn out different, let each decorate his product individually.
For work you will need:
- Wooden counting sticks - 1 box.
- Glue.
- Paints or felt-tip pens.
- Bugle.
- Beads.
- Sequins.
- Rhinestones.
These products can continue to be decorated with lace. If you want to make a big house, do not forget about the windows, in each window opening you can install "flower pots" cut out of paper. To make wooden sticks “grasp” faster, fasten them with ordinary stationery clips for a while.
You can make beautiful snowflakes from these sticks, fasten three sticks crosswise, decorate them - such Christmas-tree toys look just great. Hang snowflakes from counting sticks on the windows, let them sway from the light blow of the breeze.
Twigs with bright button berries

For work, you will need a sheet of paper, a handful of multi-colored buttons, a thick thread for a twig and glue.
First, a thick thread is glued onto a sheet of thick paper or cardboard to make an impromptu twig; we’ll glue a couple more layering knots on it. Now by the end of the thread we glue a couple of dozen buttons - this will be a bunch of berries.
Try to make out the buttons by color: red, yellow, blue clusters. Since you are creating a magical picture, you can get an amazing tree with bunches of berries of different shades.
Why not be on a twig such berries of different colors, because in nature there are both yellow and blue purple and red berries. Remember that blueberries still grow - first green, and then, ripening, turns into reddish, then almost black.
Cute egg box caterpillar
Each house has an egg box. Cut just one strip, you get a long "caterpillar" with five to four humps. Now you need to paint the craft in green, in the first hump make two small holes to insert horns from straws for juices into them.
It is advisable to glue the straw with paper with a pile, two beads are useful as eyes. A couple more minutes of patient work - a pretty caterpillar is ready! This craft is beneficial to use as a box for gifts - turn over the "caterpillar" and put a candy or small souvenir inside each compartment.
For work you will need:
- Paper box for eggs.
- Two straws for juice.
- Paints.
- Beads.
- Glue.
Let each guest have a souvenir on the table - a small caterpillar with impromptu gifts. You can pack inside and wishes, come up with them yourself!
Video instruction
Large soft rug made from leftover yarn
Want to make a very big present for your beloved grandmother? Assemble a soft rug from pompoms, the color of the yarn does not matter at all, it is important to make a lot of them. Start working long before the New Year to assemble a ready-made soft rug under your feet for the holiday.
To work, prepare:
- Cardboard - rings for pompons are cut from it.
- Yarn of different colors.
- Glue.
Every housewife knows how to make pompons. Two dense rings are cut out of cardboard, the threads are wound tightly around them so that the pompom turns out to be voluminous. After the yarn is cut, you need to form a round beautiful pompom.
Lay the pom-poms tightly next to each other on the floor or on the table, you can place the first pom-pom crafts in the center, then place rings of pom-poms of different colors in a circle. The main role here is played only by your imagination and sense of color.
When the picture is assembled, just glue the pompons together. It is better to stick the finished rug to the base - thick fabric, so the crafts will never fall apart.
Snowman

To create a snowman you will need salty dough, toothpicks and a garlic press. Do not be alarmed by this custom set.
- Make the dough. Divide the mixture into two parts. Color one with food color blue.
- Roll two round cakes of different sizes from white dough. This is the head and torso of the future snowman.
- Work on your face right away. Blind the nose, eyebrows and eyes from the blue mass. With a toothpick, draw a mouth and make some notches around the eye.
- Make hands out of white mass and blue legs out of it. Attach the elements to the body.
- From the blue mass, blind a hat, apply a picture with a toothpick, attach to the head.
- Roll out a small sausage from the blue dough. Make a scarf from the strip, put it in place and paint it with a pattern. Notches create a fringe effect. Attach buttons.
- Insert a toothpick into the snowman’s left hand. Pass a little blue dough through a garlic press and make a broom out of noodles. When it dries, put on a toothpick.
- It remains to dry the snowman and cover with a layer of acrylic varnish. He will make the figure brighter.
New Year's crafts are diverse in complexity and materials used. And it doesn’t matter what toy with children you make for the New Year. Put your soul into the work, and the result will be original and unique.
Crafts of the symbol of the year 2019 - Yellow Earth Pig
On the eve of the New Year of the Yellow Pig - we will make toys with the baby, they can be hung on a Christmas tree or presented to guests. Let it be simple and unpretentious products, but made by yourself, everyone will like them.
A toy from threads - a bright soft pig
For work you will need:
- Yellow and brown yarn, as the year of the Earthen Pig comes - 2 hanks.
- Cardboard - cut out patterns for pompons - 1 sheet.
- Scissors - 1 piece.
- Felt pink or red - a couple of pieces.
- Buttons for the eyes of a piglet - 2 pieces.
- Glue - 1 tube.
A method of manufacturing pompons has been known for a long time, we cut circles out of cardboard, we make holes for threading threads. A child will be able to wind yarn in circles, but let dad prepare the circles. The main thing is that the winding is tight enough. You can wrap threads of any length and do not even bind them together - the pompon will turn out even after processing.
It is important to make several pomponichiki of different diameters - large for the body of the pig, small for the nose and four very small for the legs. Ears and legs can be cut out of felt, choose the shape of the future soft toy yourself. To the legs at the end of the work we glue the hoof from felt or cardboard.
We start with a large pompom, wind the threads tightly on two rings of cardboard, cut and form a round body - let the piglet be plump. Scissors align the pompom to make it perfectly round.
In the same way we make the second small pompom - this will be the nose of the pig. Which thread to choose for winding on rings - depends on your imagination. It is important to beautifully design the first two details of a future soft toy.
Now, legs or hooves are cut out of pink or red felt or four more tiny pompons are gathered if you decide to make a pig on plump legs.
With the help of glue, a toy is assembled, and the soft piglet from the threads is ready! You can hang it on a Christmas tree or make several such toys as a gift to guests.
Toys made of polymer clay

Babies like to work with plasticine and polymer clay, so make some fun piglets with your child. You can buy polymer clay at any stationery store. This material for creativity is well stored in the refrigerator and does not spoil for a long time.
For work you will need:
- Polymer clay.
- Paper clips with vinyl coating.
- A piece of foil.
- Bead for the eyes of a pig.
- Decoration of a toy - beads, velvet, sequins.
The body of the piglet is made of clay, for the paws it is better to use the most ordinary metal clips with vinyl coating, which can be bought at the stationery store. Choose a color depending on the shade of clay. From such a clip we also make a tail-ring. It’s easier to make the head out of foil - roll the ball and attach bead eyes to it after processing.
Next is just the assembly, you can form not only the body itself, but also decorate it with a bristle, draw lines and circles on the body of the piglet with a thin stick, an ordinary toothpick is suitable. Foil the pig’s head with a thin strip of clay, attach eyelids and cilia over your eyes, let the little pig’s face smile - there’s no limit to imagination. Imagine a live pig and do not forget about the ears and tail with a ringlet.
If you really want to make a fluffy boar, you can glue pieces of velvet or fabric with pile to the finished toy. Now it’s important to leave the finished figure until it dries completely, and then decorate it — let your New Year’s pig be very beautiful.
It is advisable to make several figures, why not create the famous Nuf-Nuf, Naf-Naf and Nif-Nif? Give each piglet an individuality, and then the Year of the Pig will certainly be successful!
Carnival masks from plastic plates

Are you inviting a fun company of kids? Prepare some fun masks for them, make them so easy that you spend no more than an hour on all the work, and beautiful light masks will be a wonderful gift for the guys.
For work you will need:
- Plastic disposable plates.
- Plastic cups.
- Buttons
- Cardboard.
- Acrylic paint.
- Nail scissors.
- Thin elastic.
We color plates and cups in pink, leave for drying. On the plate, note the slots for the eyes and mouth. Cut out the holes and prepare the mask: a patch is glued from the cup. To the bottom of the glass you need to attach a couple of buttons - these are nostrils.
On a plate around the mouth cutout, draw a smile. Glue or draw eyelashes, eyebrows over the eyes. Then cut out the ears as well - they also need to be glued to the mask.
If you want to make a mask for a little girl pig, you can braid a couple of braids with bows at the ends and attach them over the ears. On the forehead you can lower the playful little bang, let the masks differ from each other.
And now the fun begins - we attach a thin elastic band next to the ears, you can try on the first mask on yourself and look in the mirror.
Video lesson
Last year's crafts
The symbol of the coming year at the gala table has long become a tradition. In 2018, it was a dog. It is not difficult to buy a souvenir or soft toy, but hand-made crafts will bring more joy.
Workshops on creating Christmas crafts are a good help in mastering this art. And they make such toys from various materials. I will give instructions for creating a toy dog out of a towel. You will need thick paper, a marker, a contrast tape and a set of thin rubber bands.
Dog out of the towel

- Lay the towel on a flat surface. Roll both long sides into the middle and secure with clothespins.
- Mentally divide the resulting tube into four parts. Leave the first part on the paws, and collect and fix the ends of the second with an elastic band. From the resulting loop, form a forehead and a muzzle. Secure with rubber bands.
- From the remaining two parts, make a back and support. Turn the fourth part inward. This is enough to complete the formation of the image and give the product stability. The silhouette is ready.
- Decorate with decor. Tie a bright ribbon around the puppy's neck. This is a collar. Fold a piece of tape in half and fix the ends. Put the folded ribbon in the hole in the top of the head - the ears are ready.
- From thick paper, cut out the eyes and nose, glue to the face with double-sided tape. The reliability of the design will give pins - you get a soft, cute, beautiful puppy.
Pillow
Let's create an original soft pillow resembling the muzzle of a good-natured animal. To work, you need several types of multi-colored fabric.
- Cut an oval from light fabric. This is the front of the future pillow. Using black material, make the same blank for the back of the pillow. From the contrast material, cut out 4 parts for the ears in the form of a droplet.
- Sew a rounded spot to the light blank in the area of the left eye. Next, make and attach the eyes, mouth and nose.
- Connect the front and back of the pillow, leaving a small hole for the filler. Do not forget to sew in your ears. Fill the pillow with a padding polyester and sew a hole. The product is ready.
With minimal time and effort, a successful result is obtained. Be patient and build up, guided by the recommendations and imagination set forth in the article.
The most original and interesting crafts
Some products that will become a decoration for the home or a gift for a loved one are simple, but original and interesting. About such crafts will be discussed.
Christmas balls from old floppy disks

Why not decorate the Christmas tree with luminous balls? Make them so simple that you collect at least five balls to decorate the Christmas tree.
For work you will need:
- Small foam balls.
- A couple of old floppy disks.
- Glue.
- Beads, sequins, beads, bugles.
- Wire.
Foam balls can be bought at the needlework store. Begin work by piercing each ball through with a needle or wire, make loops at the ends of the wire.
Floppy disks with scissors or pliers cut into small pieces. The sizes of the pieces must be arbitrary.
Evenly glue the entire surface of the foam ball with pieces of luminous floppy disks. Paste the beads into the seams between the pieces of luminous material and empty spaces, the brighter they are, the more beautiful the crafts will turn out.
You can glue small pieces of Christmas-tree decorations into the seams between floppy disks - rain, hoarfrost ... Let it make such a shaggy ball.
It remains to tie a rope to one loop - and your impromptu decoration is ready!
Tiny Eggshell Piglets

Take a couple of eggs and blow the contents out of them. Now there is a basis for light toys from threads.
For work you will need:
- A pair of chicken eggs.
- Yellow or green threads.
- PVA glue.
- Beads or beads.
- Felt.
Coat the shell with glue and wind the threads on it. It is better to take yellow or green threads, since we are waiting for the year of the Yellow Pig. When the threads are wound, once again glue the work with glue and leave it to dry completely.
It remains to break the shell and pour it out of a light thread ball. To make a real pig - you need a nose, ears and a tail-eyelet. Use felt; it adheres very well and is not so heavy. The eyes are a pair of beads.
Glue a thread to the back of the baby piglet to hang the toy on the Christmas tree.
Small ladybugs from the bottoms of plastic bottles

For work you will need:
- Plastic bottles for mineral water - according to the guests.
- Acrylic red and black paint.
- The wire for the antennae.
- Black buttons.
- Glue.
You can cut the bottom of a half-liter plastic bottle with a knife or scissors. Turn the cut piece up with the bulges up, paint them red - environmentally friendly acrylic paints will come in handy.
Black spots on the back of the bug can also be painted or glue small buttons. It remains to stick the antennae and eyes - a small, lightweight "ladybug" is ready.
You can put such a toy in the center of the plate and hide a cute souvenir for the guest under it!
Christmas toys from light bulbs
- Take some old light bulbs. Cover each blank for a future Christmas tree decoration with a layer of glue and sprinkle with sparkles.
- Wait for drying, tie or glue a loop from a thin ribbon.
Snowflake

- Draw a beautiful snowflake on a piece of paper, lay a sheet of waxed paper on top of the image, and apply a thin layer of detergent on top.
- Using a glue gun, circle a snowflake. Leave the workpiece to dry.
- Carefully peel off the glue blank, cover with a layer of PVA and sprinkle with sparkles. It remains only to attach a loop of thread.
Fairy jar
- Take a small glass jar with a tight-fitting lid. Glue a small plastic Christmas tree to the bottom.
- Fill the jar halfway with clean water, and fill the remaining space with glycerin.
- Pour some sparkles into a jar of Christmas tree, add a little tinsel and cork tightly with a lid. To see a miracle, just flip the jar.
Holiday hats
- For the manufacture of Christmas hats, take sheets of colored cardboard and cut large circles.
- Fold the cones from the cardboard blanks and fix the edges with glue. Trim the bottom.
- Decorate the surface of hats with sparkles and multi-colored foil, glue tinsel around the base.
- Fasten two strings on the base so that the Christmas hats are held on your head.
It’s easy to make an interesting and original New Year’s crafts. This lesson brings pleasure and charges with a festive mood.
Tips for needlewomen and kids
Do not try to make toys and gifts quickly, it’s better to tinker with each product for a longer time, then the crafts will turn out to be really beautiful.
Do not take expensive source materials for work, it is better to make some unusual toys from what is already at home than to worry that the purchased items are spoiled and will no longer be useful.
Make a lot of beautiful inexpensive toys as a gift, everything that is done by yourself is much higher than the most expensive imported souvenir. You will be pleased to tell the guests how you worked on creating a small masterpiece.
New Year's crafts are made from a variety of materials, including paper, napkins, burned out bulbs and even towels. Fantasy will help create original gifts, decorations and greeting cards.
The examples of crafts considered in the article are a tiny particle of what is present on the Internet. I hope my tips come in handy, and some interesting ideas will find a place in your practice. Experiment and prove that everyone can create a miracle without significant costs!
Watch the video: DIY ROOM DECOR! 26 Easy Crafts Ideas at Christmas for Teenagers. NEW YEAR DECOR 2018 (November 2024).


-
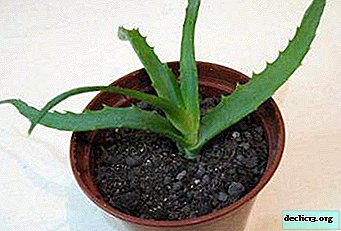
The most important condition for growing a healthy plant: the right soil for aloe
Aloe is a succulent plant, whose homeland is the island of Madagascar, the territory of Africa, Morocco, India, China. The flower not only has an original appearance, but also has many useful properties - healing and cosmetic. Not so long ago, it became known that volatile, included in its composition, effectively disinfect indoor air. ... -

-

-