Stylish table decor: ideas and workshops
The kitchen table is always considered one of the main pieces of furniture in the house. This is not surprising, because it is precisely after him that close people gather for sincere conversations, celebrations and cozy tea drinking. That is why we propose to make a decor for it with our own hands. After all, even such trifles help create a certain mood.
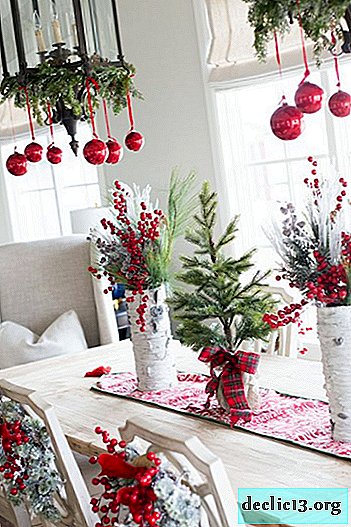


Decorative track on the table
Of course, snow-white tablecloths are a classic option that will always be appropriate. Nevertheless, for some holidays I want to choose a more suitable option on the subject. Of course, a tablecloth made of good material is quite expensive. Therefore, we propose to make an alternative option in the form of a decorative path. In this case, we will decorate it with a map of the starry sky. Agree, a very original solution.

We will need such materials:
- linen fabric of blue color;
- printed map of the starry sky;
- bar of soap;
- small brush;
- household bleach with chlorine;
- white threads;
- needle;
- scissors.

If this is the first time you are trying to do something like this, we suggest making notes on the fabric using soap. Then we draw with a brush, dipping it in household bleach. Keep in mind that it does not appear immediately, but after a few hours. If desired, you can apply several layers of the picture.

You need to draw constellations very carefully so as not to miss a single star.

In places free from drawing, you can put small dots. Due to this, the design will look more harmonious.

Large stars are stitched using a white thread. Due to this, they will be more textured. 
Stylish decorative track is ready!

If desired, you can make several tracks in different styles and colors.


Flower arrangement for the table
Every year, the popularity of eco-style design is growing rapidly. It is used literally everywhere, starting with the organization of a theme party, wedding and even a home holiday. That is why we offer to try to make a stylish flower arrangement for the table with your own hands.

Necessary materials:
- large mesh;
- nippers;
- secateurs;
- moss;
- orchids in individual containers - 3 pcs.;
- miniature plants in pots - 3 pcs.;
- sprigs of cypress, eucalyptus and thuja;
- water;
- sprinkler;
- oilcloth.
If desired, you can choose other plants.

We spread the grid on the work surface.

Gently distribute moss over the entire surface of the mesh. This must be done in such a way that the green side is in contact with it.

Press the moss until it is squeezed out of the metal cells.

We spray the moss with water to make it wetter. If the working surface needs to be protected from moisture, cover it with oilcloth.

We turn the grid with moss in such a way that we get a kind of roller.

We fasten the ends of the grid together, and then turn the roller over.

Cut the branches of the arborvitae at an angle and remove all the lower leaves. Due to this, it will be much easier to insert branches into the grid with moss.

We insert the prepared branches from one of the sides of the workpiece. We do this exclusively on the diagonal.

If your table is rectangular in shape, it is best to make an asymmetric composition. To do this, insert the branches of eucalyptus on the other hand.

In the free corners of the workpiece, we cut several mesh cells. This is best done with the help of wire cutters.

We straighten the wire so that miniature pots with plants fit into the holes. 
Water the plants so that they have a small supply of moisture. Set them in a composition of moss. If necessary, they can be removed and watered.

We insert the remaining pots with plants diagonally from the branches.

We cut the orchid flowers diagonally and return them back to containers with water. We install them between branches of thuja and plants in pots.


If desired, you can choose any arrangement of orchid flowers. But still we recommend grouping them so that they are a bright accent of the composition.

Perhaps at this stage the grid will be visible in some places. You can hide it with the help of small pieces of moss.

Beautiful, floral, bright composition is ready. It can be supplemented with other decorative elements as desired.

In fact, everyone can create such a composition. For this, it is not necessary to use these materials at all. Show your imagination, use fir branches, cones and other natural decor. Thanks to this approach, the result will be really worthwhile, and the guests will definitely not disregard your creation.


Original wipes
Napkins are an indispensable attribute of a festive table setting. Most often white products are used for this. But we suggest a little diversification of the familiar option and add bright details.

Prepare the following:
- cotton napkins;
- oranges or lemons;
- paints for textiles;
- substrate;
- paper napkins;
- brush.

Cut the citrus fruits in half and put them on paper towels. This is necessary in order to get rid of juice.


Squeeze a little paint on a special substrate in different shades.

Using a brush, apply paint to lemon or orange.

Gently, without pressing, transfer the drawing to a napkin.

Repeat the same with other shades.


When the result is suitable, just leave the napkin to dry completely. If you wish, you can iron it a little.

As for paper napkins, they can be issued in a more original way.

In this case, we need:
- paper napkins;
- scissors;
- thin wire.

Open the napkin and fold it as shown in the photo.

We turn it and fold the two edges towards the center. The rectangle is folded along the center line. After that, fully expand the napkin.

Fold it with an accordion.

We fix in the central part with a wire.

We bend each corner at an angle of 45 °, as in the photo.

We connect the ends of the accordion so that we get a star.


There are quite a few ways to fold napkins. Therefore, experiment and try something new.


As you can see, table decor can be varied. Use the presented master classes, add interesting details and the result will be really worth it.
Watch the video: Libby's Simple and Stylish holiday table decor (May 2024).


-
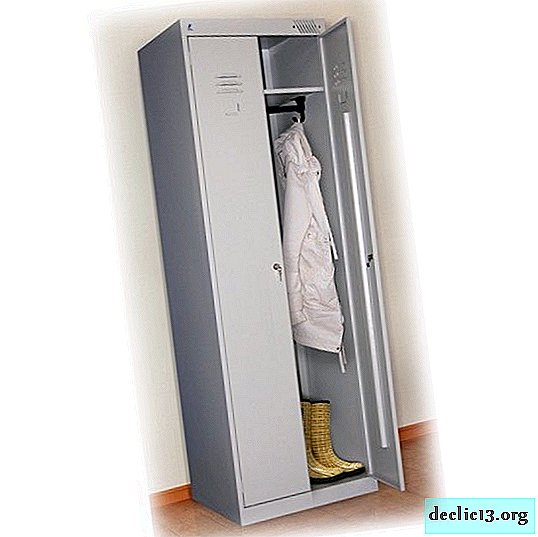
What are the 2-section metal wardrobes for clothes? Browse models
For those cases when you want to combine reliability, classics and modern design in your interior, a metal wardrobe 2 x sectional is best suited. Such furniture performs all its functions, while adding personality to the room. Purpose and features Two-door metal cabinets are firmly established in residential and industrial premises. ... -

-

-