DIY garden lamp from an old tin can
Probably, everyone will find an old tin can lying around in the country, which can be used wonderfully. Moreover, such a useful thing as a lantern will always be in demand, especially in the evening and at night. And in the summer, such a backlight will add special warmth. The most important thing is that all that is needed for this is to get an old tin can of any size, a hammer, nails and leaves, which will be used as a model for design.
1. Clean the jar

To begin with, you should prepare a jar, clean it well, remove all labels from it. This can be done using plain warm water with a soapy solution. After that, the jar needs to be wiped dry with a towel. Corrosion-prone cans should be discarded immediately. And in order to wipe it better, just pour inward to ¾ of its sand length.

2. Add water
Next, add water to the sand bank.

3. Place a tin can in the freezer

Now the jar needs to be placed in the freezer.
4. Wait until the water freezes.

Keep the jar in the freezer until the water completely freezes. Only after that it can be removed from there.
5. Choose a sheet suitable for design

Now we need a sheet for design. Choose the one that you think is more suitable, and place it on the tin can as shown in the photo. Cover it with foil and make sure that the sheet and its size suit you before you start nailing it.
5. Make the first hole with a nail

To begin, glue the sheet with tape. Next, drive in the first nail at the top of the sheet, thus fixing it on the bank. This should be done very carefully so as not to damage or tear the sheet itself.
6. Drive in the remaining nails.

Next, we make holes with the same nail along the contour of the entire sheet and along the veins at an even distance from each other to create a symmetrical pattern.
7. Check the result
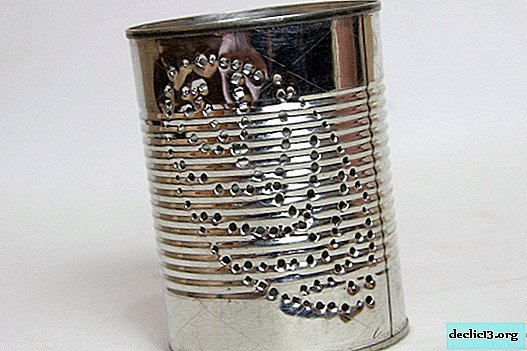
The pattern of the sheet embossed on the jar should fully correspond to the sample.
8. Color the jar

Now you need to paint the can with a spray paint bottle.
9. Place the jar in an open area

Place the jar in an open area and adjust by spraying paint to the desired shade.
10. Let the jar dry

Now the bank must be allowed to dry completely for about a day. Although, most paints can now dry even after three hours, if you store the painted object in a dry and cool place.
11. Fill the base of the can with sand
Next, fill the base of the can with sand. To do this, just put about a third of the sand inside (depending on the size of your can).
12. Place a candle in the sand

Now you need to place a thick candle on the sand in the center of the can.
13. Done!

It's time to light a candle. On this your garden lamp is ready to use!

Watch the video: How to make Tin Can Lanterns (April 2024).


-
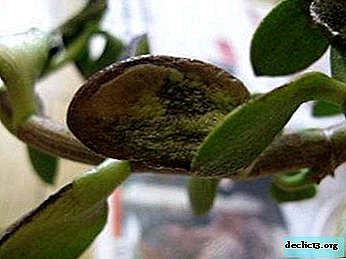
"Ambulance" for the fat girl. Money tree diseases and pests and recommendations on how to deal with them
Crassula (the second name is money tree, rossula) came to our region from South Africa. It got its name thanks to fleshy leaf plates. This plant is considered quite unpretentious in care and resistant to diseases and pests. However, such a strong plant can sometimes lose ground and succumb to pest attacks. ... -

-

-