How to make panels from wallpaper
Wallpaper panels are a modern and innovative solution for decorating a room. At the same time, the working technique is not difficult, the main thing is to correctly plan the use of a particular drawing on the wallpaper and accurately set all sizes. It is also necessary to choose the border of the border panel so that it harmoniously harmonizes with the pattern on it. By the way, not all borders are suitable for framing panels, because manufacturers can produce them for certain types of wallpaper. The border, which is connected around the panel perimeter in the corners "in the mustache" and is cut accordingly. That is why the border pattern must fit such requirements. It is also better to avoid curbs with a catchy pattern, because the “mustache” connection runs at an angle of 45 °, and the pattern may simply not converge.
Therefore, when choosing, try to pay attention to the borders with a "streamlined pattern", so you get the correct docking at the corners. When framing the panels, the border with a "lively" floral pattern fits perfectly into the interior, because insignificant matches on it are almost invisible. If you plan larger panels, it is best to use at least 2 pieces of wallpaper to create them. Immediately before gluing, the pattern must be precisely combined and the wallpaper cut to the desired length.
What materials do we need?
- wallpaper;
- border;
- knife;
- Ruler and pencil;
- wallpaper glue and wallpaper smoothing brush;
- alcohol level and wet sponge.
How to make panels from wallpaper


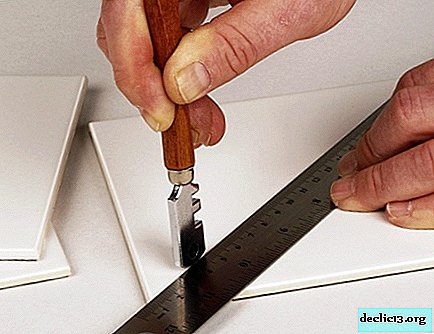
- First you need to trim the stripes of wallpaper, combine the edges and put on the table. In length, they should be slightly larger than the height of the panels. Now we take a piece of the border (we need it as a guide for the size of the panels) and a pencil. On the top of the wallpaper strips, mark the size of the panel with a ruler.
- Next, we berm a knife and cut a strip along the line. By the way, it is better to put one of the strips of wallpaper on the board, so we will protect the table from scratches. Repeat the procedure with the other bands.
- Now we need a spirit level and a ruler. With their help, we draw a line on the wall that shows the point of the lower edge on the panel. If you intend to use several panels, then it is better to draw such lines in advance for each of them.
- Now we take glue, grease the strips of wallpaper, glue them on the wall and smooth them with a brush. The strips on the lower edge must exactly match the drive line and at the same time be joined end-to-end. Got it? Fine, let the material dry.
- After the panels have dried, you can start gluing a strip of border along the upper edge. The upper edge of the panel can be used as a guide for the upper edge of the curb. In this case, it will be better if the strip of the border enters the wall from one side and the other.
- Now you can stick a vertical strip of border on top of the horizontal, while the pattern at the joints should be combined. Next, we fit the ruler to the joint (angle 45 °) from corner to corner and with the help of a knife we cut overlapping stripes of the curb.
- Gently pulling up, you can separate both pieces of the border, after which you can remove the remaining glue. Thus, we got the connection of the "mustache" border. We throw away the images, and the curb stripes on the wall must be smoothed out using a wallpaper brush.
- Using a damp sponge, we erase all glue residues on the curb and repeat the process of gluing the curb, while sequentially processing the corners. You already know how to do this.
Watch the video: How to Make Temporary Wallpaper Panels (May 2024).


-
Kitchen in the style of art deco: options for design, decoration and decoration
Content: Style History Color and Accessories What materials are suitable? Furniture Kitchen-living room Kitchen with dining room Art Deco - an extremely consistent style. It was created after the Art Nouveau period. This is a kind of response to the lack of spatial discipline reigning in modernist interiors. In the Art Deco style, it’s worth decorating the whole house or apartment if you are a fan of the blockbuster film “The Great Gatsby” with Leonardo DiCaprio in the title role. ... -
-

-