Making bedside tables, all the nuances to do it yourself
The bedside table in a bedroom or any other room is a necessary attribute of furniture. You can buy a finished cabinet with a set of other furniture, but, as a rule, its cost is unreasonably high. To create an original, individual piece of furniture with minimal costs, you can test your strengths with the independent manufacture of cabinets. To have an idea of how to make a nightstand with your own hands, you need to have information about the necessary materials and tools, as well as step-by-step work.
What is needed to make a cabinet
When making the nightstand for the first time, you need to start with the simplest option. This is a universal wooden table, which is suitable for placement in a bedroom, study or living room. Other options, such as a cabinet for a television system, will require more time and effort to manufacture.
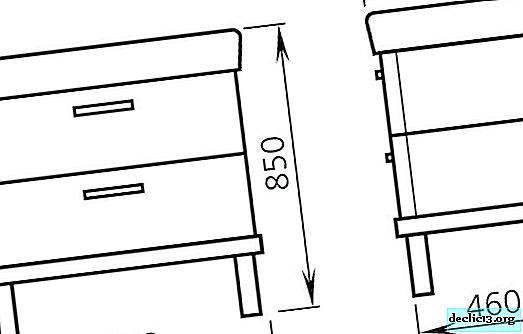 Solid wood bedside tables can have different sizes
Instruments
To make a bedside table with your own hands you will need the following tools:
- jigsaw;
- end saw;
- Sander;
- roulette;
- sandpaper;
- pencil;
- drill or screwdriver;
- Screwdriver Set.
 Instruments
In addition, you will need a cutter for loops with a diameter of 35 mm, a set of bits with a hexagon for confirmations, the diameter of the holes for which should be at least 8 mm, when located at the end - 5 mm. You will need an iron to glue the edges on the end parts of wooden parts. The edge can be bought at any hardware store, matching the color of the lumber from which the cabinet is made. It has an adhesive side, which is applied to the end, and is ironed on top with a hot iron through a dry rag or any rags. Excess edges are removed with a knife.
In addition to the above tools, you will need a carpentry "right angle" with a measuring ruler. To connect the shelves and side walls, you can use a special tool to establish connections on dowels. This tool helps to drill holes in the side shelves with a drill using the dowels installed. To do this, pre-drill holes in the ends and install dowels. On the back of the shelves, marking is done so as not to confuse them during assembly. Then the shelves are applied to the attachment points, after which the holes are made.
Materials
To understand how to make bedside tables with your own hands of a standard size, you need to know what you need:
- 4 panels of chipboard or other material measuring 45x70 cm for the manufacture of upper, lower and side parts;
- 8 boards for the manufacture of a frame measuring 7x40 cm;
- 4 panels of chipboard or other material for the manufacture of boxes with a size of 17x43.5 cm.
- dowels 2x1.8 cm and screws 4x1.6 cm;
- if confirmats 5x70 mm in size are used, they need to be purchased in quantity of 22 pieces;
- joiner's glue;
- acrylic sealant;
- wood stain.

 It’s worth preparing all the elements in advance.
The choice of material for the manufacture of cabinets varies depending on the budget. Particleboard is considered the most low-cost material.
When choosing chipboard as the material for the manufacture of bedside tables, it is necessary to pay attention to the degree of its moisture, which can lead to curvature of the finished product. The stand can also be made of natural wood, MDF, plywood or laminate. For the manufacture of dowels, cranial blocks, wooden rails, frame planks, tabletops, it is recommended to use solid types of wood - oak, beech or birch. The thickness of the boards for the manufacture of the frame is from 12 to 40 mm, depending on the functionality of the bedside table, its load. The back side of the structure is usually made of chipboard with a thickness of 4-6 mm, if there is no serious load on the bottom of the boxes, they can also be made of this material. To finish the material, you can use a self-adhesive film in color and texture, corresponding to the rest of the furniture in the room, covered with acrylic varnish. For natural wood stain or colorless impregnation is used.
Hardware
If a do-it-yourself cabinet is made with drawers, it is necessary for them to purchase special accessories - guiding mechanisms. As an alternative to guides, as more affordable, L-shaped wooden planks can be used, which are attached to the side walls of the nightstand from the inside where the boxes will be.
If the cabinet will be equipped with a door, it is necessary to prepare hinges for their fastening. To ensure the opening of the door by pressing, elevator mechanisms are used. In order to prevent the door from opening spontaneously, you can equip the nightstand with a magnetic latch.
As supporting hardware, you can use stationary or legs, adjustable in height, as well as castors. Convenient are the wheels with a bearing mechanism, which can spin in different directions. Such accessories are useful for bedside tables in the living room. For doors and drawers it is also necessary to purchase handles for opening. The number of handles, hinges, guides depends on the number of drawers and doors.
 Do-it-yourself metal hardware needed for making a bedside table
Manufacturing steps
Before you make a cabinet, you need to determine its shape and size. It can be a cabinet with a door, several drawers, with an open shelf, or a combination type. Then you need to make drawings that will help make accurate workpieces.
Parts preparation
When the schemes with the exact dimensions are ready, you can begin to produce blanks for the cabinet. First, a sketch of the blanks from cardboard is applied to the tree, then the outline is cut out exactly with the dimensions applied. The inaccuracy in the size of the cut out elements can reduce the whole work to nothing. High-quality sawing of wooden parts will provide a jigsaw. Then all parts are machined by a grinder to ensure smooth edges. If the design is not planned to be decorated with a self-adhesive film, at this stage it is worth processing all the details of the bedside table with a stain.
After processing the cut parts, you can begin to drill holes for fasteners and accessories. When sampling for loops, it must be borne in mind that the distance from the edge of the facade to the central part of the hole should be 22 mm. For hinges with a landing size of 35 mm, markings are made on the top and bottom of the door. To fasten the shelf, you need to drive 4 dowels on the sides of the cabinet (two on each side). The dowel holes are made on the upper, lower part of the wall and on the upper end. If you make a cabinet for a sink with your own hands, a hole of a suitable diameter is cut out on the countertop where the sink will be fixed.
 All the necessary holes are prepared in the details.
 Marking
Assembly
Before you make a cabinet with your own hands, you need to assemble its wooden frame: 7 cm wide slats are fastened together with screws or screws, forming a rectangular frame. The corners of the frame must be straight, this is checked using the appropriate measuring tool. Then, the upper part of the nightstand, the countertop, is attached to the rectangular frame. For reliability, attachment points are additionally coated with wood glue. After assembling the upper part, the sidewalls are assembled, in the last turn the back and front wall.
On the inner side of the frame are mounted rails for guides. The assembly of the box itself is as follows:
- the made blank for the box is placed on a flat surface, with the help of a confirmation drill, holes are made for confirmations;
- the case from the blanks for the box is twisted. At this stage, it is important to check with a square the correctness of the construction angles;
- the bottom of the box is assembled from fiberboard - placed on a frame of planks, nailed with small studs 25 mm;
- guides are mounted on the lower corner joints.
The end of the main process, how to make a bedside table with your own hands, is the fastening of pens, legs or wheels, as well as the decoration of the finished product.
 On the side panel we fix the bar
 All trims are fixed at the same distance
 The second side panel is installed on top
 Ready frame
 Top panel mount
 Peg preparation
 To mount the pegs, you need carpentry glue
 Peg mounting
 Top panel frame
 Guidance
 Rail mounting
 Guide adjustment
 Installation Result
 Drawer side panel
 Drawer frame
 Fasten the bottom of the box
 Bedside table without front panels
 Machined Faceplates
 Glue application under front panels

Dressing
A do-it-yourself bedside table can become an original decoration of a room. To do this, it can be issued in various styles. For example, you can create a classic style bedside table if you use pastel shades (yellow, sand, soft pink, light green). At the same time, the ends of the curbstones are drawn up in white, and the colored elements are individual elements, including the upper part and the door. On the door you need to attach wooden or plastic moldings, and on the countertop - a piece of glass or transparent plastic, cut to its size. The moldings should be painted in a color that differs in tone from the color of the facade.
When decorating bedside tables, it is necessary to take into account the style and decoration of the entire room so that the product does not get out of the general design.
Instead of decorating the finished product, you can use the original ideas for making a bedside table from improvised materials:
- bedside table from old suitcases: for this you will need an old suitcase, which is attached to the frame with legs. The external case can be painted or decorated using decoupage technique.
- console from the old table - for this you need an old coffee table, from which half is sawn off. The second half is attached to the wall, painted in bright color. In addition, you can use the old drawer from the desk, simply by attaching it to the wall - you get an unusual hanging cabinet.
- a small wooden staircase, a barrel, a chair, a stack of books tied with a belt - all this can be used as bedside tables.
- from a regular wooden box you can get a bedside table with open shelves. To do this, you need to attach legs to it, or fix it on the wall.
In addition, there are many other unusual ideas on how to make a bedside table from improvised materials that can be seen in the photo.
Video
Watch the video: 50 Shades of Gray Living & Dining Room Makeover for CloeCouture! (May 2024).


-
Poda Island in Thailand - Beach Vacations Far from Civilization
Poda (Thailand) is the nearest island located off the coast of Ao Nang, near the beaches of Raili and Phra Nang. Poda leads the island group, which also includes the island of Chicken, Tab and More. The attraction is located in Krabi province, 8 km from the mainland of Thailand, so the road to the island takes no more than 20 minutes. ... -

-

-