Reproduction of phalaenopsis: how to plant a baby from a peduncle or basal part of an orchid?

The easiest way to propagate phalaenopsis is reproduction by the shoots, that is, by children.
The thing is that the Phalaenopsis orchid belongs to the monopodial type of plants. Often, children appear on the peduncle or in the basal part of the plant. For orchid growers, especially beginners, it is important to know how to properly handle the processes.
In this article we will tell you what it is and how to separate and transplant this process, get the roots, and also about how to take care of it further.
Plant structure
This type of orchid belongs to the monopodial type. It always grows exclusively up. When phalaenopsis is young, each subsequent leaf is larger than the previous. But when the orchid becomes an adult, all of its leaf plates acquire the same size. Moreover, the more light, the longer the sheets will be, the less lighting, the shorter the leaves.
Roots can grow even between leaves - this is normal for phalaenopsis. One of the features of the structure of orchids is the presence of children. This is what they will be discussed later.What is a young shoot and what does it look like?
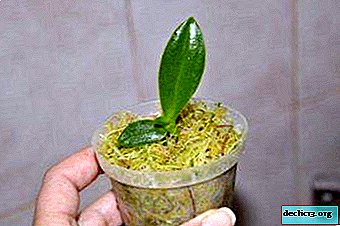
A baby is a young shoot of a plant. And it looks like a small copy of an ordinary adult orchid.
Where can a baby form? Most often, it begins to grow on a peduncle that has recently dropped faded flowers. But sometimes you can observe the baby on the stalk of the phalaenopsis, and on its basal part.
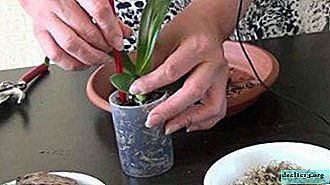
Photo
The photos below will help you figure out how to distinguish a phalaenopsis baby growing from a trunk, from a peduncle and from the basal zone.


Reasons for education
A baby may appear on its own after the plant has dropped its last buds, provided that the room will be high humidity and high temperature. But you can make phalaenopsis release the process. For this you need:
- After flowering, shorten the peduncle by 2-3 centimeters.
- Do not forget about the mandatory difference in daily temperatures (keep it within five degrees).
- Maintain high levels of humidity and heat in the room.
- Choose a pot that will be slightly larger than the entire root system and which will easily ventilate the soil.
- Limit watering for 15-20 days.
Another way to stimulate the appearance of the baby can be called the use of hormonal cytokinin paste. It must be applied to the kidney, which is previously cleaned of scales. This procedure will wake the sleeping Phalaenopsis kidneys and will soon give the baby growth. But to do this is better in early March.
In what cases is precipitation not recommended?
The processes that appeared on the peduncle and root can be separated, but this can only be done when you see the first 2-3 roots five centimeters long. But you need to do this with extreme caution so as not to damage the mother areas of the plant.
But the children who formed on the stem, experienced flower growers are not advised to cut. They do not have their own root system, and if the processes are improperly manipulated, the chances of harming the mother plant increase.
Transplant at home step by step
Preparation: tools, soil, pot
 No special devices are needed in order to deposit the shoot from an adult plant. First you need to take a sharpened knife (it doesn’t matter if it is a kitchen or office appliance) and treat it with alcohol so that everything is sterile clean. You can replace the knife with sharp, preferably manicure, scissors. And take care of the availability of processing materials: cinnamon or crushed coal.
The flowerpot should be very small with holes not only at the bottom, but also preferably on the side surfaces of the container. Do not forget that the flowerpot should be transparent. Be sure to lay the drainage layer on the bottom of the pot. The next layer will be moistened (this is necessary) bark.
ATTENTION! Do not spill bark to the top of the flowerpot. Half will be enough.How to carry out the separation?
From the mother plant
Dry the plant before this procedure, Do not water it for at least two weeks.
This is largely done in one motion, but the main thing is to carry out this manipulation with extreme care so as not to harm the "mother".
- So, you already have a processed blade (knife, scissors). Carefully cut the baby from the lateral peduncle. In this case, do not touch the main part of the peduncle to ensure further growth of phalaenopsis.
- Allow cut areas to dry.
- After that, treat the cut sites with cinnamon or crushed activated carbon.
- Transplant the shoot into the prepared soil mixture (for details on how to transplant a Phalaenopsis orchid at home, read here, and from this article you will find out when and at what time of the year it is better to transplant a flower).
From cut flower stalk
Unbelievable, but it is a fact. According to experienced growers, shoots can be grown even on a cut flower stalk. Most often this happens when the florist understands that the orchid will die soon, but does not want to say goodbye to the flower. In such a situation, the peduncle is cut from a dying plant.
You can even divide the flower shoot into cuttings, but you need to do this so that a kidney is preserved on each of them.
Organize a home greenhouse for escape and they grow it there under the same conditions as for ordinary adult plants. And they wait until the appendix appears.
After you see a couple of leaves and roots on the baby, she can be sent to “free swimming”. But in this case, it must be cut off along with the peduncle section and planted in the same composition in moist soil.
From the root zone
This process is considered the most difficult, since in this case there is a high probability of damaging the roots of an adult plant. Therefore, most experienced gardeners agree in the common opinion that such a baby should not be separated. But if you still decided on this step, then adhere to the same instructions that were given for separation from the peduncle.
Attention! In this case, the baby can be separated only if the mother’s root system is sufficiently formed and healthy.Is it worth it to separate from the stem?
Again, this is not recommended. As the sprout that the orchid gave on the stem usually does not let out roots, then trimming it will not lead to anything good.
Follow-up care
A small orchid needs to be looked after in the same way as an ordinary adult. Briefly describe all aspects of phalaenopsis care:
 Watering. Note that you do not need to water the shoot immediately (do not forget that they planted it in a moistened bark). The first time to carry out this procedure is best done on the second or third day after the transplant, and then everything is as usual - once every seven to ten days.
- Air temperature. It should be high at the beginning - not less than 22 degrees above zero. Observe the conditions for maintaining the difference in daily temperatures.
- Air humidity. It is advisable at first to raise its level to 70-100 percent. And in the future it will be possible to keep this indicator at the level of 60-80 percent.
- Lighting. It must be constantly continuous and at a sufficient level. Stick to the criterion at 10-12 hours a day.
- Top dressing. Start fertilizing the young plant in the second week after transplanting. The rules are the same as for adult phalaenopsis.
 Watering. Note that you do not need to water the shoot immediately (do not forget that they planted it in a moistened bark). The first time to carry out this procedure is best done on the second or third day after the transplant, and then everything is as usual - once every seven to ten days.
When and how to root?
It may happen that the baby has long been formed, released several leaf blades and even bloomed, but there are still no roots on it. In this case, we will independently grow the roots for the subsequent planting:
- To begin with, we will cut the process from the mother plant as described above.
- You can’t immediately put it in the ground, since there simply will be nothing to eat there. Place the baby in a greenhouse, which we create at home. To do this, take a plastic container (it can be an ordinary cup). It is necessary to make drainage holes in it.
- At the very bottom we place a expanded clay layer in a small layer, and then moist moss.
- You can even make holes in the upper part of the container, into which then extend the supports for the process. We place a basal rosette of the flower on top of this support.
IMPORTANT! Make sure that the phalaenopsis outlet does not touch the moss. It should be located a few millimeters above the substrate.
- Cover the resulting structure with a plastic bottle. So we organized a home greenhouse. If there is no bottle, it can be replaced with a plastic bag, it’s not scary, the main thing is that a greenhouse effect is formed.
- After a month, a maximum of two, with proper care you will see roots that will reach a length of 3-5 centimeters. After that, you can plant the young plant in the usual soil for orchids.
Rooting in moss is less common. To do this, simply place the baby in it and cover it with any container to form a greenhouse effect. Caring for a plant in this state is minimal: spray ten times a day.
When will bloom?
 No matter how you like to see the flowers of your young plant as soon as possible, do not rush to do it. Blooming too early can harm the plant. Outwardly, everything can go quite well. But the consequences will manifest a little later: the orchid will weaken and begin to hurt. This will happen because phalaenopsis will give all its strength to the opening buds, and there simply will not be any health left on the roots and leaves. Indeed, for the "children's organism" this is a huge load.
Therefore, in no case do not stimulate the formation of buds on the orchid. This should happen by itself, and not earlier than one and a half to two years after the transplant. Remember: everything has its time.
Perhaps we talked about all the stages of growth and development of the baby Phalaenopsis orchid. We hope this information will be useful to you and you will heed our advice.


-
Varieties of sleeping sofas, popular transformation mechanisms
Arrangement of a comfortable berth is a prerequisite for a complete rest of a person. Of course, it’s best to have a bed for a healthy sleep. But unfortunately, in small-sized apartments it is not always possible to install it. A compact but comfortable sleeping sofa with an orthopedic mattress will be a worthy replacement. ... -

-
-