Is it possible to transplant an orchid if it blooms? When is this required and how to do it right?

Orchid is a very beautiful flower, popular both among professionals and amateurs. From time to time there is a need to transplant it, but how to do it correctly so as not to harm the orchid, especially if it also blooms?
But is it worth disturbing a flowering plant and is it possible to transplant it? in this article we will consider in detail when and how to transplant a delicate flowering plant. You can also watch a useful video on this topic.
Can a flowering plant be disturbed?
The flowering period is not the best time to transplant. The plant concentrates all its forces on the pasture of flower stalks; orchid energy may not be enough to adapt to new conditions. But in exceptional conditions, transplanting will do more good than harm the plant.
Immediately after shopping at the store
The newly purchased orchid should be transplanted in such cases:
 When a plant has a damaged pot, or the walls of the container do not transmit light.
- If no roots are visible in the container. Healthy roots are green, dry ones become silvery, other colors are signs of disease or rot. In this case, the orchid is immediately transplanted.
- The store substrate is often of poor quality, with peat and foam rubber, which is why it cakes and promotes root decay. It is better to replace it during a transplant.
- Shriveled and pale roots are a sign of treatment of plants with flowering stimulants. After purchase, such an orchid is transplanted immediately.
 When a plant has a damaged pot, or the walls of the container do not transmit light.
We described the features of orchid transplantation after purchase in this article.
Watch a video about the factors when you can and should transplant a blooming orchid:
If it has long been growing in your home
An orchid that has long been growing at home is transplanted during flowering if:
- The plant looks sick or has pests in it.
- The roots of the flower have grown and do not fit in the pot.
- The substrate is caked and accumulates a lot of water.IMPORTANT: In the pot, the tendency to caking of the substrate occurs in two cases - it is initially of poor quality or the flower is improperly looked after, for example, it is watered too abundantly.
- Leaves turn yellow, covered with dots and dry.
- If the roots sprouted into the walls of the clay pot.
- The deciduous mass of the flower became larger than the pot.
- Orchid roots rot in a very humid environment.
In case of decay, the orchid needs to be transplanted immediatelyThis condition is very dangerous for the flower. Many gardeners are wondering - is it worth it to do this during flowering? Transplanting a plant when it blooms is only a last resort, but it is still better than watching how it dies.
Watch the video about the need to transplant a blooming orchid:
Pros and cons of transplanting during flowering
Is it possible to transplant a plant during the growth of a peduncle or if it only released it? The main plus of transplants is immediate assistance to a damaged or weakened flower. Cons more - this is a serious stress for the orchid. If you have to prune the damaged roots and replace the substrate, the flowers will fall off, so it’s better to shorten or completely cut the peduncle.
During flowering, the plant gives the peduncle all its strength necessary for the formation of seeds. A transplant performed unnecessarily at this time can destroy not only the flowers, but the entire orchid. But if everything is done correctly, flowering will not only not stop after transplanting, but may also last for a longer period. Shortening the peduncle in this case can provoke the appearance of lateral peduncles and a rapid increase in the root mass of the orchid. In this case, the plant will only become healthier.
When do you need to do this?
 Plant transplantation can be planned and unscheduled. A planned transplant is a regular procedure performed on average once every 2-3 years.
It is better if the transplant coincides with the end of the flowering of the orchid, when the plant begins to produce new leaves and roots. In the middle of the outlet, a small sprout will begin to be visible, green tips will appear at the roots. Successful periods for orchid transplantation are spring and early autumn (you can find out about the characteristics of a plant transplant in the fall here).
An emergency transplant is needed if the plants fade one by one, the roots darken, a plaque appears on the pot. Transplantation in the summer is contraindicated - the plant experiences severe stress due to heat. In winter, the flower is at rest, so it is not worth changing the pot too.
Basic Rules
It is important to properly prepare for the operation, pick up the tools, substrate and pot. You need to work with the flower carefully, without damaging the roots and not crushing it. All manipulations are best done with a well-dried plant - wounds from cuts on the roots are better healed without moisture. If the substrate does not separate, then it can be moistened, but after carefully drying the plant. After transplantation, the plant should not be placed in places with direct sunlight.
Training
We collect the necessary inventory:
- sharp scissors or a small pruner;
- a new pot and means for cleaning it - soap, boiling water, manganese;
- coal for root treatment;
- 70% alcohol for disinfection of instruments;
- a basin suitable for work;
- drainage - expanded clay, ceramic shards, pieces of brick;
- a peduncle holder and a stick for pushing the substrate between the roots;
- new substrate;
- fertilizers, if necessary - preparations for the prevention of rot and insecticides.
How to choose a new pot?
Orchid pot must meet certain requirements:
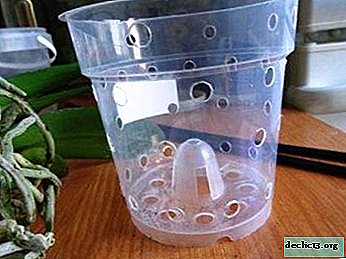 It is better if it is a transparent plastic pot - all damage to the roots is visible in it, the plant does not grow into the walls and receives enough light.
- Do not choose translucent pots of dark colors. Light promotes better flower growth. In the case of a brightly lit window sill, translucent pots are preferable to transparent ones.
- The pot should have enough openings for drainage - the water should not stagnate, but the flower should not dry out. They should be located up to one third of the height of the pot.
- Correctly calculate the size of the pot - if the plant has grown greatly, take a capacity of 1-2 centimeters more. When there are a lot of damaged roots, the orchid will need a smaller pot - it will be difficult for a weakened flower to master a large amount of substrate. It will be optimal for a planned transplant to take a pot of the same size as it was. Here we talked about how to transplant an orchid into another pot.
 It is better if it is a transparent plastic pot - all damage to the roots is visible in it, the plant does not grow into the walls and receives enough light.
Clay and glass pots are not suitable - they do not pass oxygen well. The selected container must be thoroughly washed with soap or doused with boiling water, disinfected with a solution of manganese and dried.
Watch the video on choosing an orchid transplant pot:
Suitable soil
The substrate must be prepared in advance. A good soil for orchids meets the following requirements:
- Be light, airy, do not cake after watering.
- Do not retain moisture for a long time - a good substrate dries in 3-5 days.
- Soil must be selected in accordance with the humidity of the room - the drier it is, the more water-absorbing the substrate should be.
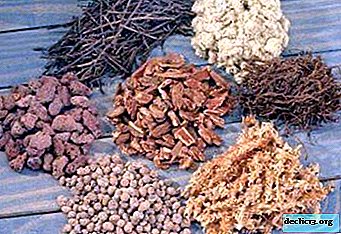
Ready soil can be bought at the store. It usually consists of: pine bark, sphagnum moss, fern roots, charcoal. You can use pure pine bark without additives.
You can prepare the soil for orchids yourself:
 Collect bark from fallen or sawn pines. Choose healthy, without trash and pests.
- Rinse well with water and treat with boiling water to remove tar, fungi, pests.
- Boil for 20-30 minutes.
- Divide into two parts - cut the secateurs finely, the other into pieces up to 3 cm.
- Put the bark on the trays and dry thoroughly.
 Collect bark from fallen or sawn pines. Choose healthy, without trash and pests.
The substrate can be soaked for 2 hours in a weak fertilizer solution, and then also dried.
If desired, sphagnum moss is added. He is soaked for 24 hours in warm water. Ground coal and peat will be needed if the plant needs recharge.
Watch a video about preparing a substrate for an orchid:
Step-by-step instructions for home use
First of all, they are shortened to a sleeping kidney or flower stalks are cut. This is necessary so that the plant tolerates the transplant better. Next, perform the following steps:
- We extract the orchid from the pot. 10 minutes before, water abundantly so that the roots become supple and do not break. Next, gently squeeze the orchid near the ground, turn the pot over and remove the lump.
If your flower grew in a clay pot, roots could grow to it. The capacity will have to be carefully broken and transplanted along with the adhering shards so as not to damage the orchid.
The substrate is shaken off from the roots. If it does not work out, they are washed under a stream of warm water, carefully removing particles of old soil.
- The next step is to dry and inspect the root system. Sick, shriveled, discolored or diseased shoots are detected.
- Identified defective roots are cut to the green part, treating the wounds with crushed coal (how to cut orchid roots during transplantation and not harm the plant, read here). Dried leaves and peduncles are also removed. Withered leaves are removed as follows - cut along the central vein and removed from the stem.ATTENTION: To prevent rot, the roots are soaked in a special solution before being treated with charcoal, and then dried.
- The 3-5 cm pot is filled with drainage. A small layer of substrate is poured on it.
- The plant is installed in the center of the pot, a support for the peduncle is installed nearby. Then the soil is gently filled up - at first large, then small. It is gently pushed between the roots with a stick, but not tamped. From above it is possible to lay the soaked sphagnum moss. During filling with the substrate, do not damage healthy roots, this can lead to the death of the plant.
After planting, the first 3-4 days the plant is not watered to avoid rot and disease. If pests are found on the roots during transplantation, the plant is soaked in an insecticide solution.
Watch the video about the correct transplantation of a flowering orchid:
Follow-up care
The orchid does not require special care after transplantation, but it is better to protect it from the sun at 7-10 days. Less disturb the flower. Provide comfortable conditions for the orchid after transplantation - a temperature of 20-22 ° C, protect from drafts.
Conclusion
Orchid is a very delicate flower that needs constant care and care.. Transplanting, especially during flowering, is very stressful. But if you do everything right, you can enjoy beautiful and graceful flowers for a long time.


-
Recommendations on how to get petunia seedlings from seeds at home
Petunias are photophilous and thermophilic flowers from South America, which Russian flower growers fell in love with for their long lush flowering. These plants are erect, creeping and densely branched; have whole leaves, pubescent by hairs; single funnel-shaped flowers; a shallow, root root, which allows you to grow the plant in small containers. ... -

-

-