Reasons for growing an orchid in a flask and step-by-step instructions for transplanting it

There are no women who would not admire the beauty, color diversity and attractiveness of orchids in their hearts. At one time, Russians bought Phalaenopsis orchids and boasted of buying for girlfriends. Now do not surprise anyone with them.
In search of an unusual flower, some buy the Kinabalu Gold orchid for 5-6 thousand dollars, while others buy an orchid in a flask.
Is it hard to care for her? Is it necessary to transplant it from a transparent mini-vase, a hermetically sealed lid? This is what we will talk about in the article below.
Read more about the flower from the bulb
Recently, tourists from Thailand and several other Asian countries have been carrying the flag. On the one hand, flask is a souvenir, and on the other is the best way to save money when buying an orchid and bring it in value and safety to the homeland.
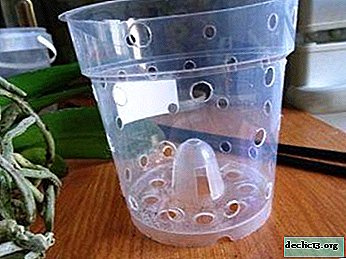
What is a flask is a container or a flask, a vessel or a can of glass or plastic. Whatever it looks like - round, square, rectangular, its walls are always transparent. Experienced gardeners use the flag, propagating the orchid in a natural way.
- They pollinate the plant, wait for the appearance of dust seeds.
- Then they are transplanted into a flask, where the environment for growth, development and nutrition is ideal.
- Having closed, they clean it in a place warm and drowning in the rays of sunlight.
- With the advent of seedlings and having waited until they get stronger and grow up, they open the flag and transplant the orchid in a regular pot.
Where and at what price is it sold?
An orchid in a flask bought in an online store will cost from 4 thousand rubles for residents of Moscow and from 1590 rubles for St. Petersburg residents. The price depends on the type of flower and the size of the bulb.
Advantages and disadvantages
The pluses from buying an orchid in a transparent, hermetically sealed container are more than the minuses:
 The possibility of self-growing seeds.
- The plant is more resistant to diseases and pests and, unlike orchids grown from seeds in an ordinary pot, blooms annually.
- Cheapness.
- A worthy gift for friends brought from a trip to the countries of Southeast Asia (Vietnam, Thailand).
- The acquisition of several exotic orchids of different species.
 The possibility of self-growing seeds.
Everyone who wants to buy an orchid in a flask should know the cons of buying:
- When growing seedlings in a flask, flowering is expected no earlier than after 2-6 years.
- Not all types of orchids will be accepted in this container, but only Phalaenopsis, Wanda, Dendrobium, etc.
Do I need to transplant?
In one small vessel brought from Asian countries, upon arrival home, they discover not one orchid, but several dozen seedlings. Do I need to transplant them from the flask into ordinary pots? Yes, they do this no earlier than 2 weeks after arrival. You can read about the proper planting of orchids in this article.
Transplant orchids from the bulb in stages:
- "Acclimatization" after a trip to relieve stress. The flask is placed on a windowsill, which is buried in the sun, where it will be warm and there will be no drafts. The optimal period of "acclimatization" is 10-14 days.
Reference! They do not wait two weeks if during transportation the flask turned over and the contents were mixed. Also acted if seedlings rest against the top of the container lid.
- Transplantation with precautions.
- Organization of proper care.
Step-by-step instruction
- Transportation of orchids in a flask in integrity and safety from Thailand to Russia.
 Place it on the windowsill, where there will be suitable conditions for future growth (temperature, humidity, lighting).
- Buy a pot with transparent walls to transplant it.
- Preparation of the substrate (moss + pure bark fine fraction / bark + coconut chips + moss). The bottom of the pot is covered with pebbles or fragments of pottery for drainage.
- Removing from the flask.
- Accurate placement in the pot and filling all the voids in it with a substrate.
- Organization of proper care for the transplanted orchid.
 Place it on the windowsill, where there will be suitable conditions for future growth (temperature, humidity, lighting).
Before moving
Before transplanting, the vessel with the orchid is placed in the correct environment.. He is placed on the windowsill, where there will be no drafts and where she is not in danger of hypothermia. It will be grown on it after transplantation.
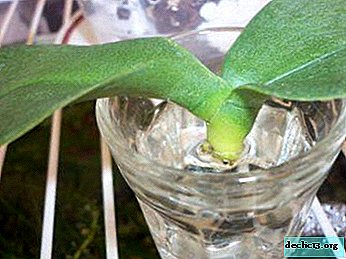
How many seedlings are inside the flask? 3-5 or several tens.
Transplant from a flask into a pot
There are several ways to remove an orchid from a bulb. Some people think that the flower will not have stress if you take it out through a narrow neck.
Others prefer to wrap the container in a cloth or newspaper, and then break it, taking up a hand-held item. Who is right? The second method is preferred, as it allows you to save all the leaves that appear, not to damage the root buds when removed.
Professionals act differently by pulling seedlings by adding water to a transparent container. Also, if it is not glass, but plastic, simply cut it and observe all safety precautions when removing fragile seedlings.
- Removing the plant from the flask, release it from excess agar.
- A bunch of seedlings is washed under a stream of tap water, and then they are thoroughly dried using paper towels.
- Sprouts are sprayed with a solution of fungicide Fundazole or Fitosporin.
- They wait half an hour, and then place them in a pot, sprinkled with a substrate.
Adult orchids are watered less often. Also, seedlings need to be fed, but when preparing fertilizer, they are not bred in the same proportions as on the instructions: there should be more water in it, and less active substance. If the rays of the sun rarely look at the window, you will need a luminescent backlight.
Next, a visual video about transplanting seedlings from a flask:
You will learn how to choose the right pot for this in a separate article, and how to plant seeds, bulbs or plant babies, read here.
Follow-up care
 After replanting seedlings, cover the pot with plastic wrap or glass. This is done in order to create the same conditions as in a flask; like in tropical latitudes, where it’s hot, but the humidity is high.
Condensation on the walls of the pot or on the glass is fought with daily rubbing and airing. This will prevent root rot in seedlings. As soon as the orchids have real roots, care changes
Possible problems and difficulties
- The inability to take out seedlings without damaging the leaves and roots.
- The plants resting against the top of the wall or the lid of the container are transplanted as soon as possible.
- Folded leaves also make you think about transplanting in order to prevent serious damage when removed.
- Fungus development.
- Mixing the contents inside the flask.
Conclusion
Orchid in flask - a great gift for friendswhich can be brought from a trip to Thailand. She will emphasize the features of the interior solution and will become an accent in the interior for some time. Although some flower growers continue to grow it in a flask, it is undesirable to do so with it. Otherwise, you will have to take measures to protect it from the fungus. It is easier to transplant it into a regular pot and observe the growth.
Watch the video: How to sow orchid seeds inside the flask at home. STEP by STEP! (January 2025).


-
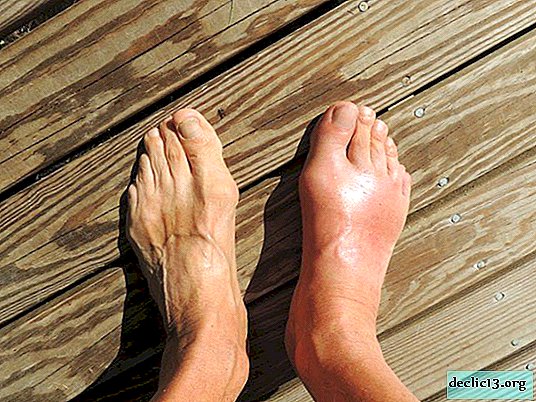
Gout - signs, symptoms, drug and alternative treatment
People have been suffering from gout since time immemorial. This joint disease is called "the disease of the kings." In ancient times, the rich abused fish, fatty meat and alcohol, because of which pathologies developed. Let's understand what gout is and how to treat it at home with folk and medication. ... -

-

-